Modular pipelines are pretty much like building with LEGO blocks. Each part does its job very well, and you can switch parts without breaking everything. In game art services, this approach helps teams create flexible and efficient production systems. It’s not just about having neat folders or well-organized files; it’s about making parts that work independently.
So, if your texture processing goes wrong, you only have to fix that one part, and everything else will keep working fine.
Here’s what actually matters.
- First, you need parts that can be swapped out without affecting ten other parts.
- Second, there should be clear rules about what goes in and what comes out of each module so that there is no guessing or confusion.
- Third, don’t assume that everyone has the same setup because they don’t, and hard-coded paths will break your pipeline for half the team right away.
The easy test is this: can a new person add a feature without asking you a lot of questions?
If yes, you built something modular, but if they need to understand your entire codebase first, then you just have an organized mess, not a real modular system.
That’s really what makes something scalable or a maintenance nightmare six months later.


How Do You Actually Build a Modular Asset Pipeline?
Let’s just not waste time and get to the point
Step 1: List the Different Types of Assets You Have
Before you start building, you need to know what you have to work with. Get together with your team and make a simple list of all the types of assets that your project uses. I’m talking about everything, like 3D models, textures, animations, audio files, VFX, and UI elements.
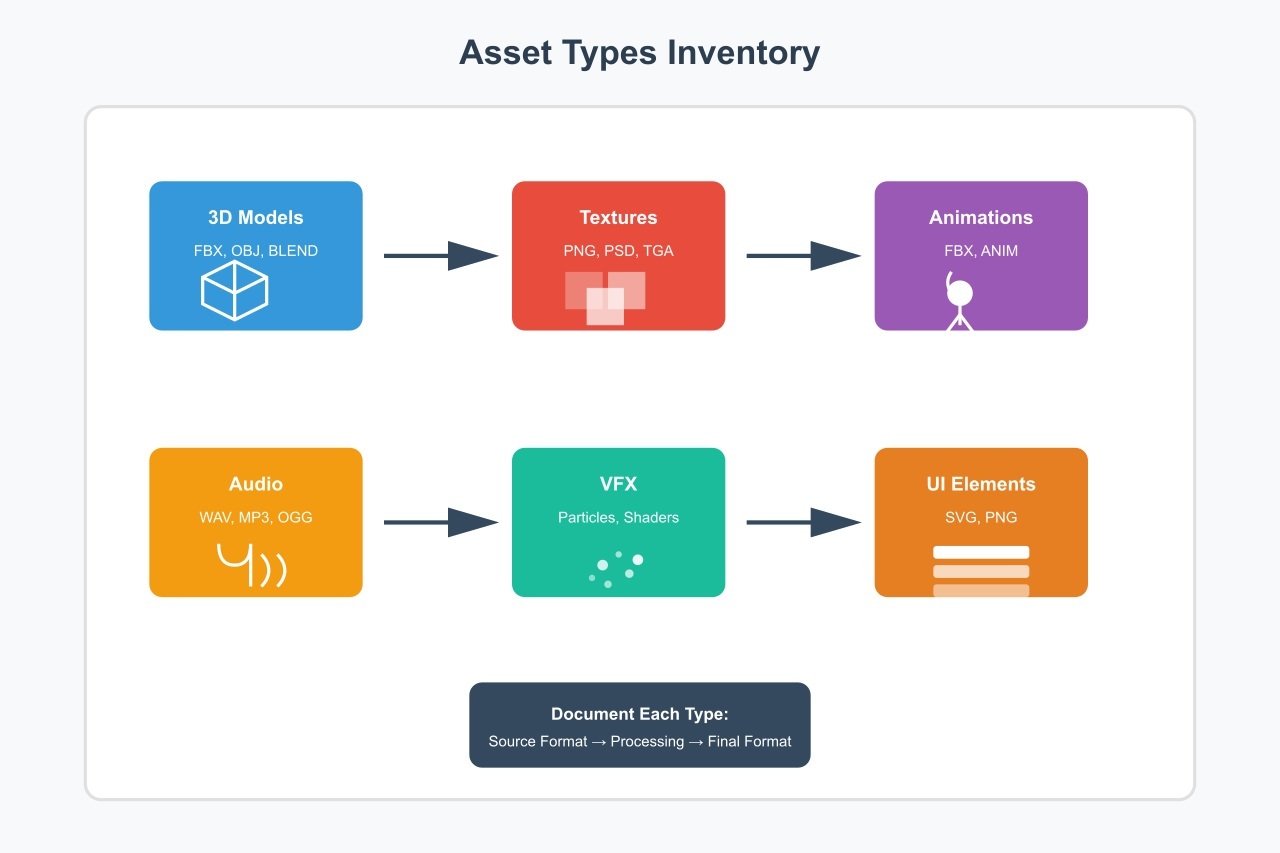
Make a list of the most important things:
- Write down every kind of asset you use
- List the format of the source (what artists give you).
- Write the final format, which is what your engine needs.
- Make a simple arrow between them.
For example, designers send you FBX files, and Unity needs them to be prefabs with certain import settings. That’s the path of your change.
Or maybe designers send you PSD files, but your game needs PNG textures that are 2048×2048 and compressed. Put it all down.
This step may seem boring, but you can’t build a modular system if you don’t know what’s going on right now.
Step 2: Make a Plan for the Main Pipeline Architecture
It’s time to plan out the main parts of your pipeline now that you know what kinds of assets you have. Here, you need to manage all sorts of modules.
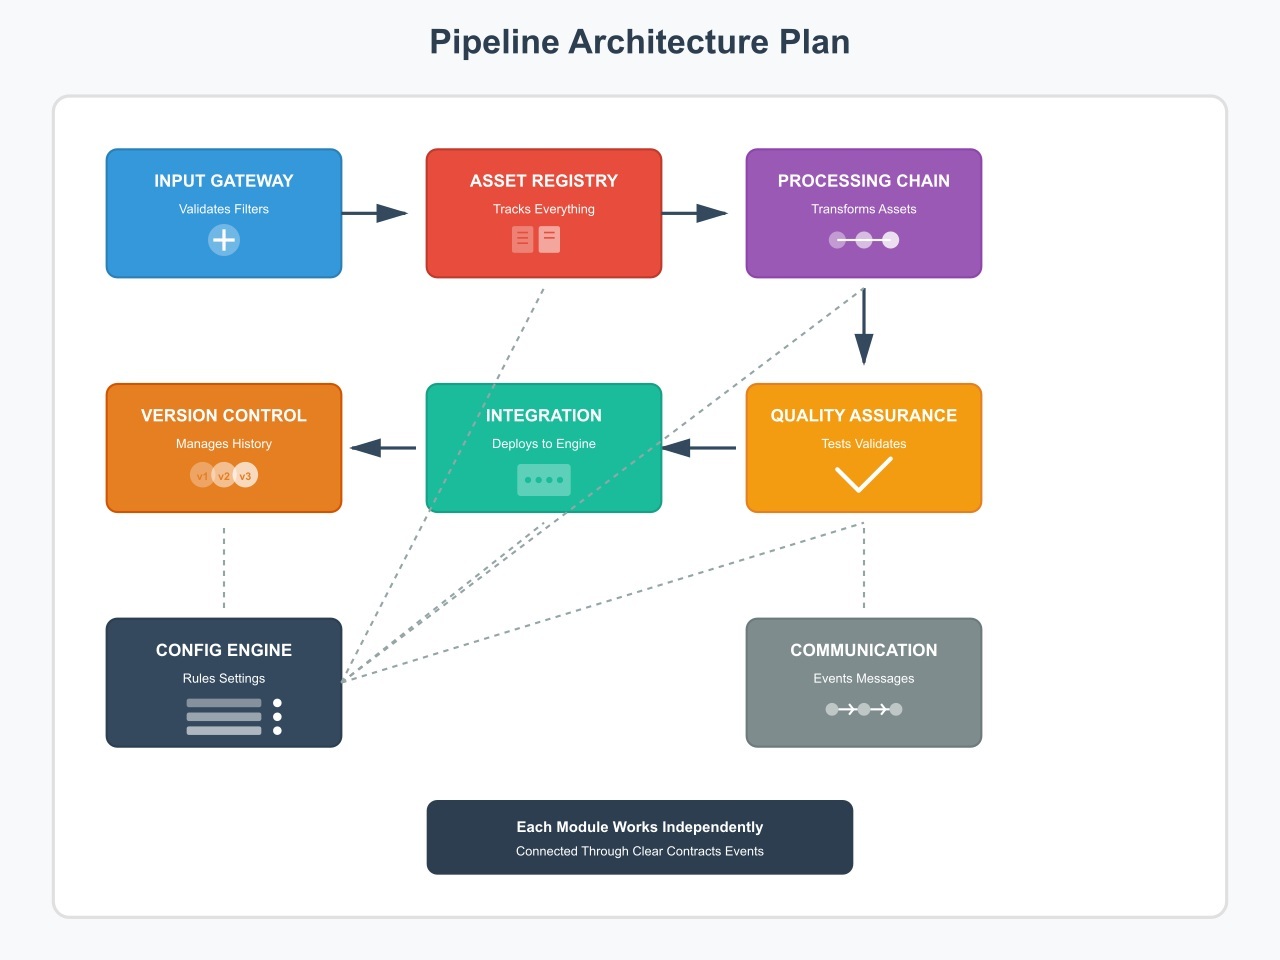
Module 1: Build an Input Gateway That Filters Everything First
This is basically the front door to your pipeline. You have to check everything that comes into your system here first.
What it does:
- Checks to see if files are real (is that FBX really an FBX?).
- Verifies that file names follow your rules
- Grabs basic information like who made it and when
- Checks to make sure the file isn’t broken
Why do this? Because a single corrupted texture file can ruin your whole build at 3 AM, and no one wants that. If you set up this gateway right, bad assets will never get into your pipeline. It’s that easy.
Module 2: Create an Asset Registry That Tracks Everything
Think of this as the brain of your pipeline. It’s like a database that always knows about all the assets in your system and keeps track of everything, such as:
- Where each asset is right now (waiting, being processed, or done)
- Which assets are dependent on other assets
- Every version of every asset you’ve ever worked on
- Who made what changes and when
You can answer immediately when an artist asks, “Where’s my character model?” instead of spending 20 minutes looking through folders.
Plus, when something breaks, you know exactly which version was working before.
Module 3: Build Processing Chains That Handle Each Asset Type
Processing chain modules is where the real work gets done. A texture needs a different kind of processing than a 3D model, so each type of asset has its own processing module.
Your module takes care of 3D models by:
- Looking at the number of polygons and the materials that have been assigned
- Automatically making LOD versions
- Fixing UV maps if they’re broken
- Making meshes for collisions
- Checking rigs and bones
To make textures, you need:
- Changing formats (like PNG to DDS or something else)
- Adjusting the size to standard resolutions
- Setting up compression
- Creating mipmaps
- Repairing normal map formats
When it comes to animations, pay attention to:
- Making sure that the skeleton fits your character
- Converting frame rates if needed
- Getting root motion data
- Putting animation data into a smaller size
- Tagging animations the right way (walk, run, jump)
Keep each module to one type of asset and don’t try to make one big module that does everything; it’s too hard to keep up with.
Module 4: Run a Quality Assurance Check Before Anything Goes Live
You need to check the quality of all your assets before they can go into your game. This module runs tests on everything automatically.
What is being tested:
- Technical details (Is the resolution right? Is the poly count right?)
- Visual checks (generate preview images)
- Engine compatibility (will it actually work in Unity or Unreal?)
- Effect on performance (too many draw calls?)
This module needs to tell artists exactly what went wrong and how to fix it when something goes wrong. Not just “error 404” but “your texture is 4096×4096, but we need 2048×2048, please resize it.”
Module 5: Integrate and Deploy Assets Into the Engine
This is the last step, and it’s where the assets actually get into your game engine. It’s different for each engine, so what works for Unity won’t work for Unreal.
It does:
- Importing assets with correct settings
- Putting files in the right project folders
- Linking materials to textures automatically
- Making blueprints or prefabs
- Setting up connections between assets
Step 3: Build the Communication Layer That Connects Your Modules
Somehow, your modules need to be able to talk to each other since you can’t have scripts that don’t know what the other ones are doing.
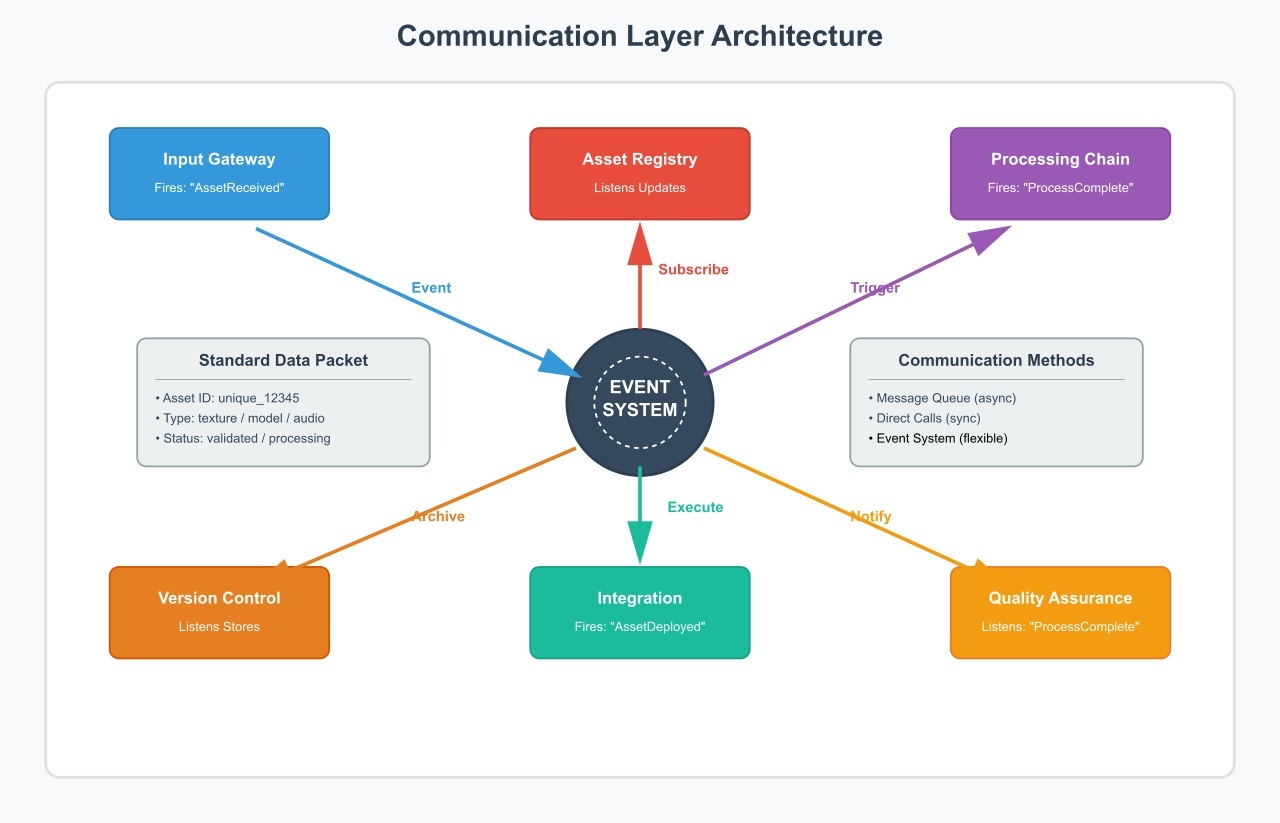
Choose a way to talk:
- Message queues (modules send messages to each other)
- Direct function calls (easier but more connected)
- Event system ( modules send out events that other modules can listen to)
I usually choose an event system for asset pipelines because it’s easy to change. When the Input Gateway finishes validating a model, it fires a “ModelValidated” event.
Then, the Processing Module listens for that event and starts working on its own. You see? Simple and clean.
You also need to decide what information goes between modules. To do so, make a data packet that all of the modules can read. This works well:
The standard asset packet has:
- Asset ID (a number that is unique to each asset)
- Type of asset (model, texture, etc.)
- File path (where it lives)
- Metadata (creator, date, and version)
- Status (validated, processing, failed, or complete)
- Dependencies (a list of other things it needs)
Adding new modules later is much easier when all of the modules use the same packet format.
Step 4: Set up the Framework for Automation
No one wants to spend all day processing assets by hand. You need automation that works without you having to watch it all the time.
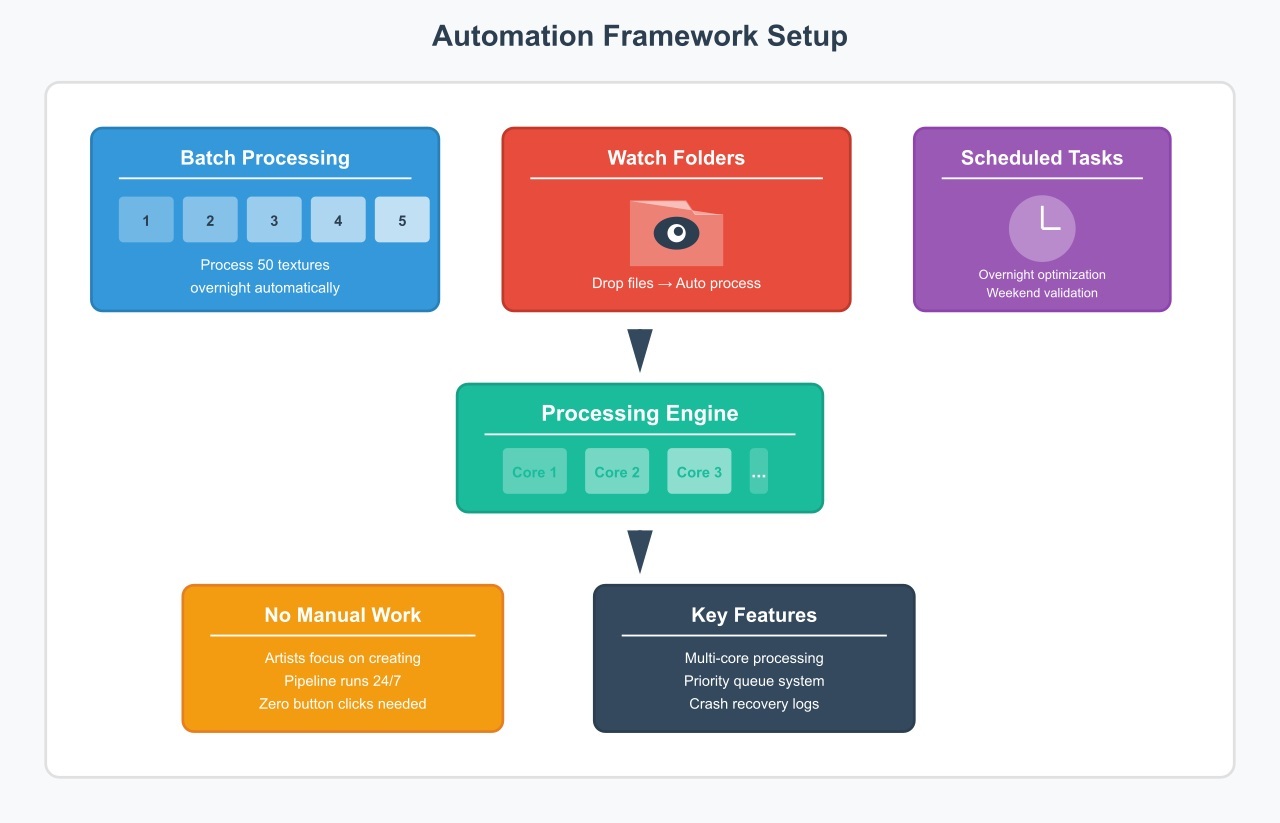
Automate Batch Processing
Make sure your pipeline can handle more than one asset at a time. The system should be able to process all 50 textures in your input folder overnight without anyone having to click any buttons. Implementation basics include:
- Make a queue for processing
- Add assets to the queue as they arrive
- Sort them by priority or process them in order.
- Use multiple CPU cores if you can
- Save your work so that crashes don’t lose it all.
Use Watch Folders to Automatically Pick Up Files
Your pipeline automatically picks up files that artists put in a certain folder and begins processing them. But how to get it going is here:
- Make separate input folders for each type of asset.
- Run a script that keeps an eye on these folders.
- Check and queue new files as they come in.
- Put processed files in the output folders.
- Put the originals in a safe place.
Schedule Routine Tasks to Keep the Pipeline Healthy
Set up tasks that need to be done on a regular basis, like making all LODs for every model or making all textures work better on mobile.
Tasks that are usually scheduled are:
- Overnight batch optimization
- Full project validation on the weekend
- Daily backup of the asset registry
- Cleaning up temporary files once a week
The most important thing is to automate everything so that artists can focus on making assets instead of dealing with technical issues.
Step 5: Build the Monitoring System
You should know quickly when something breaks or slows down.
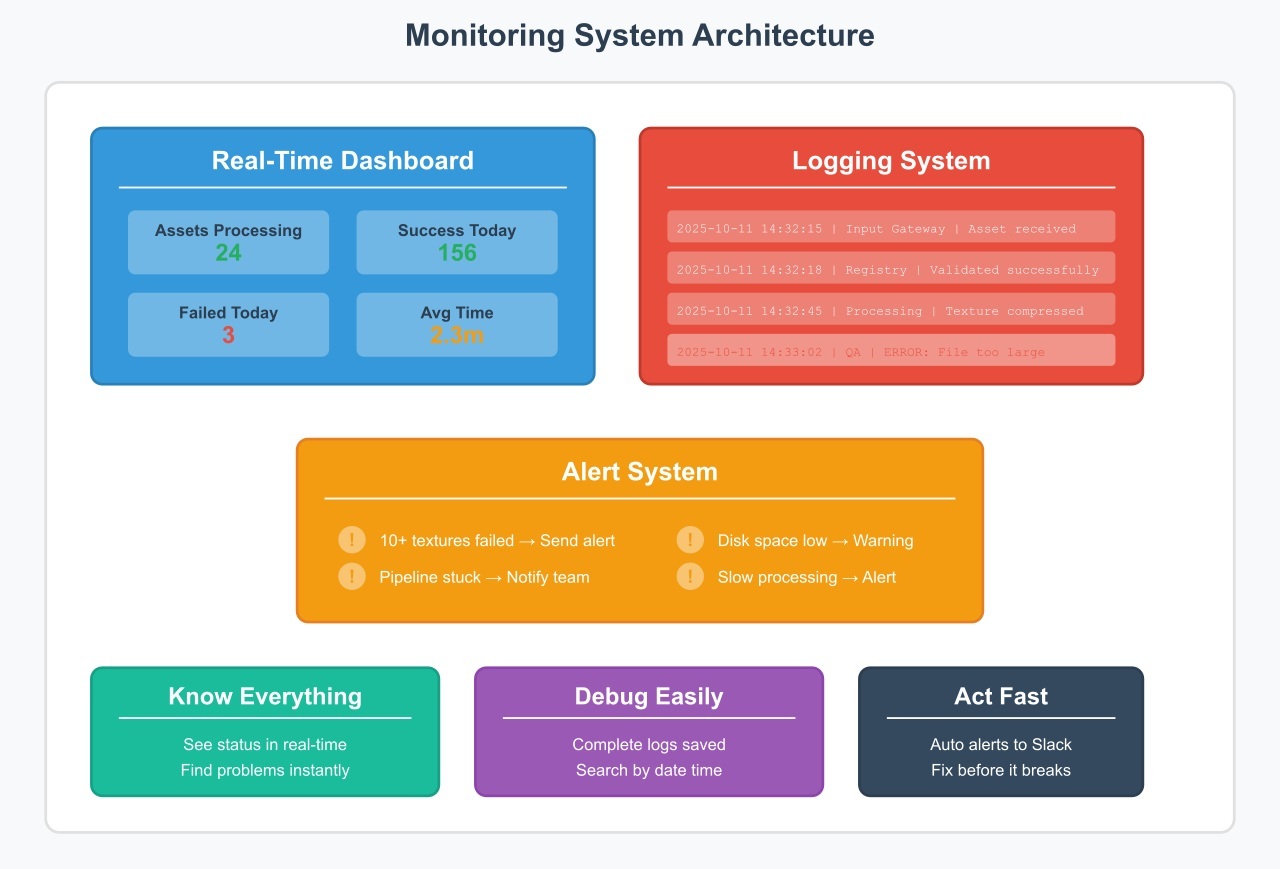
Create a Real-Time Dashboard for Pipeline Status
Make a simple web dashboard that displays the status of your pipeline. It doesn’t have to be fancy; it just has to be clear and helpful. Just show:
- How many assets are being worked on right now?
- How many people were successful today and how many were not?
- Average time it takes to process each type of asset
- Current problems (which module is the slowest)
- Recent mistakes with information
Log Everything for Easy Debugging
Every module should write logs that will help you fix problems later. Not just “an error happened,” but also a full explanation of what went wrong and why.
Logging well means:
- Time stamp for every action
- What did each module do?
- Paths for input and output files
- The time it takes to process each step
- Messages about errors with context
- Stack traces when things crash
Put these logs in a place where you can find them. When an artist reports a problem from last Tuesday, you can find exactly what happened in seconds.
Set Up Alerts to Catch Problems Instantly
Set up automatic alerts for important problems. If 10 textures fail in a row, someone should be told right away, not the next morning.
Triggers for alerts are:
- Processing errors above a certain level
- Pipeline completely stuck
- Running out of disk space
- Processing times that are too slow
- Serious mistakes in any module
Send alerts through email, Slack, or any other platform your team uses. Just let someone know when things go wrong.
Step 6: Design the Artist Interface
Never let your artists use command-line tools or write scripts because they aren’t programmers. They just need something that works without any extra effort.
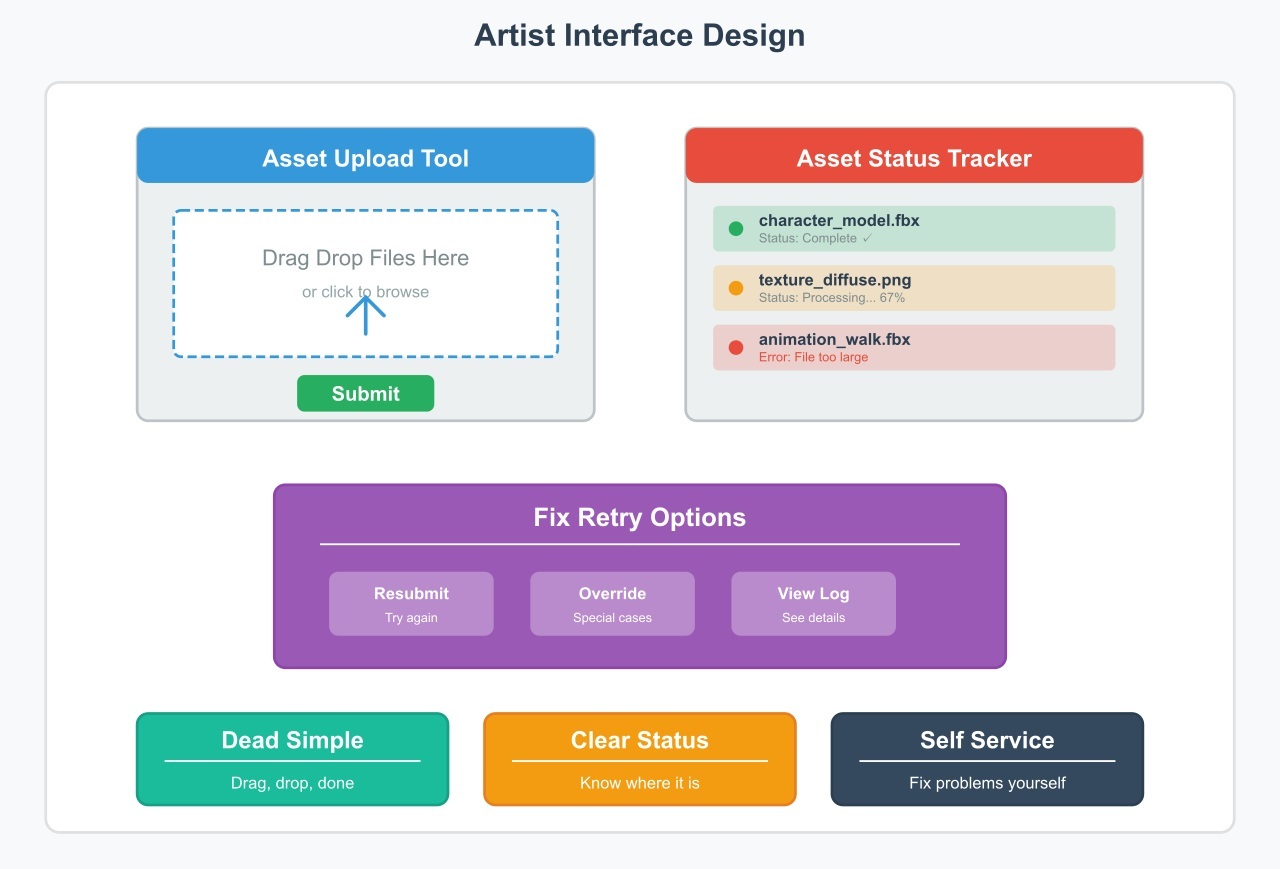
Make the Tool Effortless to Use
Create a simple tool that lets them drag and drop files, click a button, and leave.
What artists should do:
- Put their files in the tool
- See a progress bar while processing happens
- Get a clear message about whether or not you succeeded
- Find out where their asset is in the pipeline.
- Resubmit if something failed
Show Artists Exactly Where Their Assets Are
“Where’s my model?” is something artists always ask, so show them where it is right now. Create a simple status page that they can look at at any time.
Make this information easy to read:
- Current processing step
- Time left to complete
- What assets are in line
- Recent assets that have been finished
- Any mistakes with easy-to-understand explanations
Use simple English for mistakes, and instead of saying “Asset validation failed at pipeline stage 3,” say “Your texture is too big; please resize it to 2048×2048.”
Give Artists the Power to Fix and Retry
When something goes wrong, artists need to fix it and try again quickly.
Give them easy choices:
- Button to resubmit failed assets
- Change settings for special situations
- Skip certain steps if needed
- Get the processed file quickly
Step 7: Put the Extension System into action
You work with models and textures today, but next month you might have to work with procedural materials or motion capture data. So what to do?
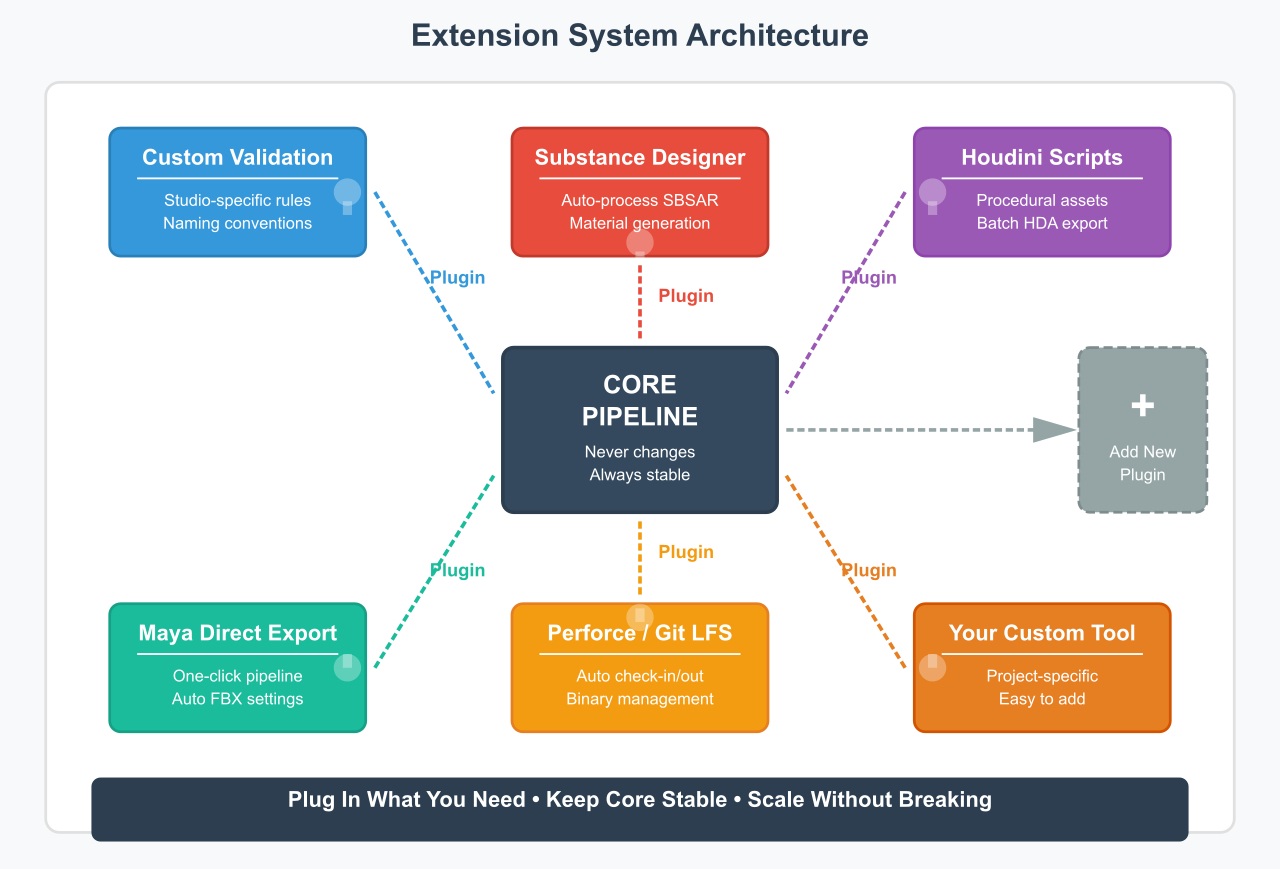
Build Your Pipeline to Be Modular From the Start
Make it easy to add new modules to your pipeline. Each module should connect to the main system without changing it.
How to get it to work:
- Set up a standard template for modules
- Customize and clear formats for input and output
- Use the same event system everywhere
- Keep modules separate from one another.
- Write down how to add new modules.
You can just copy the template, fill in the specific logic, and plug it in when you need to process a new type of asset.
Add Plugin Support for Custom Studio Needs
There are times when you need behavior that is specific to your studio. With plugin support, you can add to the pipeline without changing the core code.
What plugins can do:
- Add rules for custom validation
- Integrate external tools like Substance
- Use naming rules that are specific to the studio
- Link to private systems
- Change the steps in the processing for certain projects
Don’t put plugins in the main pipeline. This way, you can update your core system without breaking any custom plugins, and vice versa.
Connect Your Pipeline to External Tools
Your artists probably use programs like Substance Designer, Houdini, or Maya, and these tools should talk to your pipeline on their own when they need to.
Integrations that are common include:
- Export from Maya straight to the pipeline
- Automatically process Substance files
- Use Houdini scripts to make procedural assets
- Connect to Git or Perforce to keep track of versions.
- Access to systems for managing assets
Each integration is like a little module that knows how to work with that tool. Keep them simple and give each one a specific job.
Step 8: Set up the Infrastructure for Testing
You need to test your pipeline thoroughly before you give it to the whole team. There is nothing worse than a pipeline that works on your computer but not on anyone else’s.
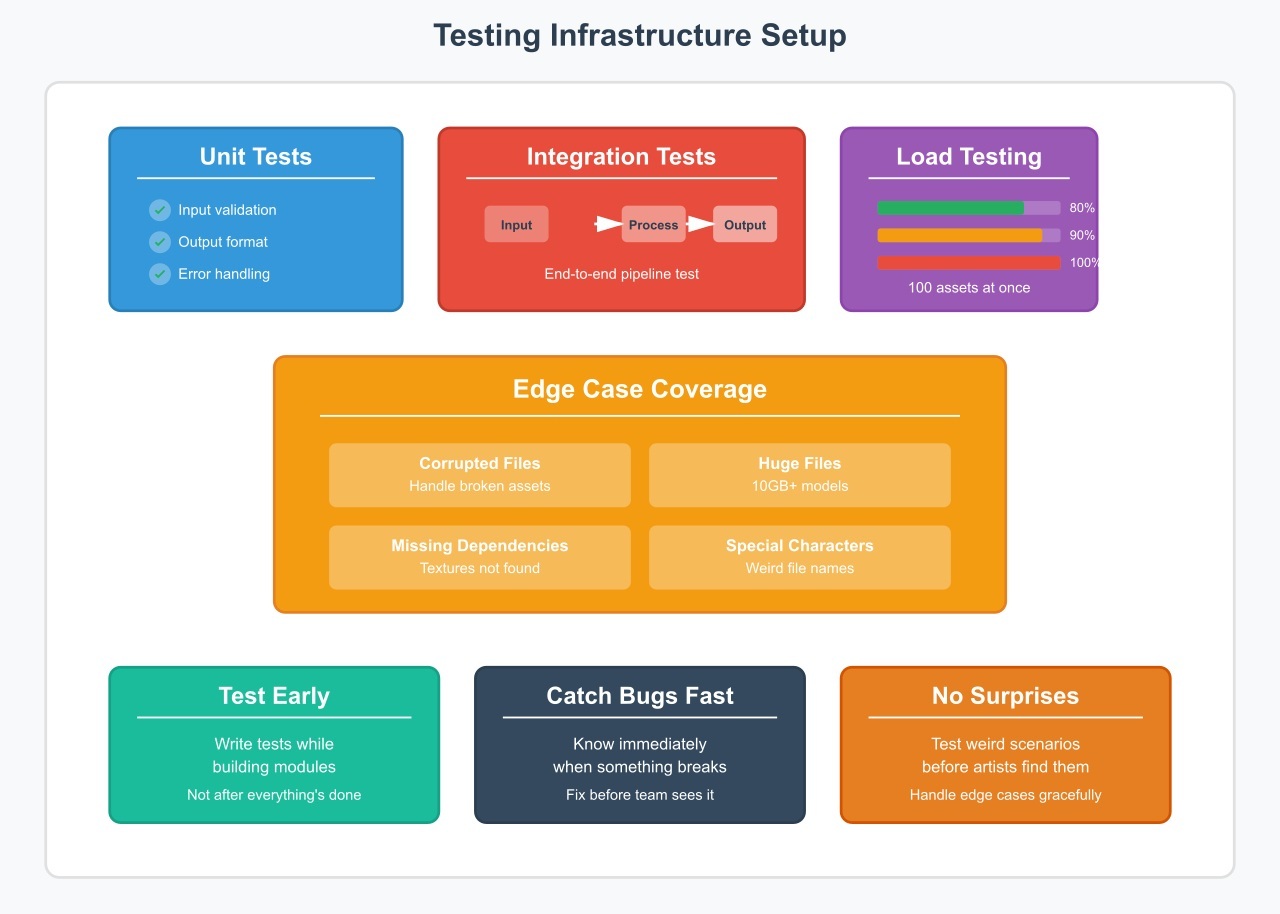
Run Unit Tests for Every Individual Module
Test each module on its own. These tests let you know immediately if you broke anything when you change something later.
What to check:
- Does it work with valid input?
- Does it properly reject bad input?
- Does it make the output in the right format?
- Does it work well when files are missing?
- Does it get rid of temporary files?
Write these tests as you build each module, not after everything’s done.
Perform End-to-End Integration Testing
It might be fine for each module to work on its own, but what happens when they work together? That’s why integration tests check the whole pipeline from start to finish.
Check out the whole integration:
- Put a test asset in the folder for input
- Watch it go through each module.
- Make sure the final output is correct and that the metadata was saved correctly.
- Check to see if the cleanup was done.
Stress-Test the Pipeline Under Heavy Load
Your pipeline works well with one asset, but what if you have 100 assets at once? Load testing shows you where bottlenecks appear under real pressure. Things to check are:
- Can it handle 100 textures at once?
- Does it get slower when you use big files (2GB models)?
- Can more than one artist use it at once?
- Is memory usage still reasonable?
- Do any modules break when they are under stress?
Find these problems now, during testing, not later when your whole team is stuck waiting for assets to process.
Cover All Edge Cases Before Release
You never know what real artists will do. They’ll upload files that are broken, name them in strange ways, or send files that don’t have all the parts they need.
Try out the strange things:
- Files that are completely broken
- Files that don’t have an extension
- Big files (more than 10GB)
- Files that have special characters
- Assets that point to missing textures
- Assets that depend on each other in a circle
Step 9: Put Together the Documentation System
When people are stuck, they need documentation, but no one reads it.
Create Simple, Visual Guides for Artists
Keep these super simple and visual. Artists need to know how to use the system, not how it works on the inside. What to write down is:
- How to send in an asset (with pictures)
- What kinds of files can be used
- How to find out the status of an asset
- What to do when something goes wrong
- Who to get in touch with for help
Write Detailed Technical Docs for Developers
Those who work on the pipeline need detailed technical documents, and this step can be harder because the audience is technical.
Talk about these things:
- A look at the system’s architecture
- How each module works
- API reference for all features
- Formats for configuration files
- Database schema
- How to add more modules
- Fixing common problems
Keep All Documentation Fresh and Accurate
It’s better to have no documentation than to have wrong documentation.
How to keep documents up to date:
- Update the docs when you change the code
- Look over the documents once a month.
- Allow users to report old information
- Get rid of old documents that aren’t needed anymore.
- Make sure version numbers are clear.
Think about using a wiki or something like it, where everyone can add to it.
Wrapping It Up
It’s not about making the best system from the start when you build a modular asset pipeline. It’s about making something that can grow with your team and won’t break when things change.
Begin with one module that solves your biggest problem right now, and then add more as you need them. The pipeline that works now and gets better over time will always be better than the perfect pipeline that takes six months to build and never gets done.
So choose one thing from this guide, build it this week, and see how much easier your life gets when you don’t have to keep an eye on your assets all the time.