Photogrammetry has completely changed the way game art is made, and we’re only beginning to see the effects.
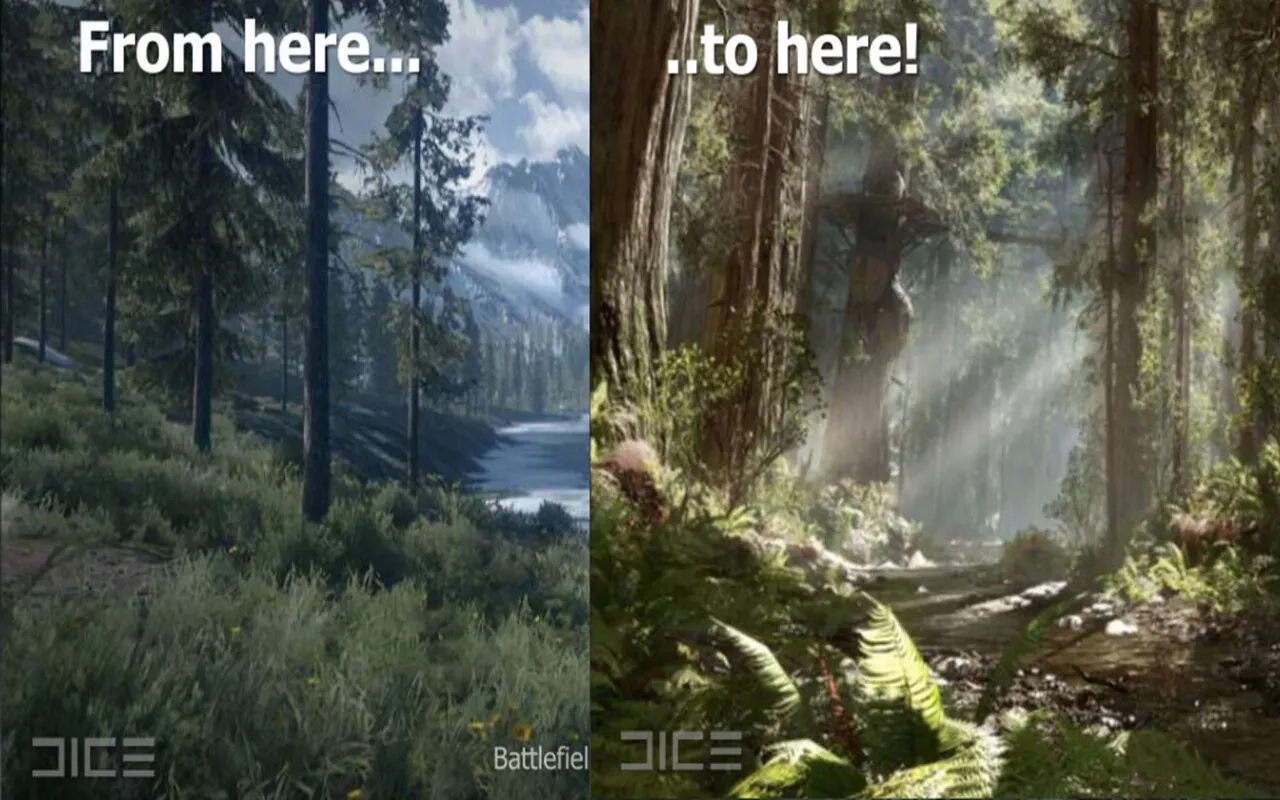
Studios like DICE cut the time it takes to make assets in half, and indie teams like The Astronauts make AAA-quality graphics on very small budgets. That’s not just talk; those are real, game-changing results, and that’s exactly what you’d expect from a top-tier game art studio pushing the envelope.
However, the technology solves the problem of having to choose between good visuals and fast production. Every time, real-world details are better than hand-painted copies. Also, modern tools like Unreal Engine 5’s Nanite make it easier than ever to put things into action.
Important things to remember for your trip:
- Use free tools like Meshroom to get started.
- Focus on photography skills alongside technical knowledge
- Before you try to draw complicated scenes, practice with simple things first.
- Make a portfolio that shows both your technical skills and your creative ideas.
The learning curve isn’t easy, but it’s definitely worth it to climb. Studios are actively looking for people with these skills, and the demand is only going up.
What is Photogrammetry in Game Art?
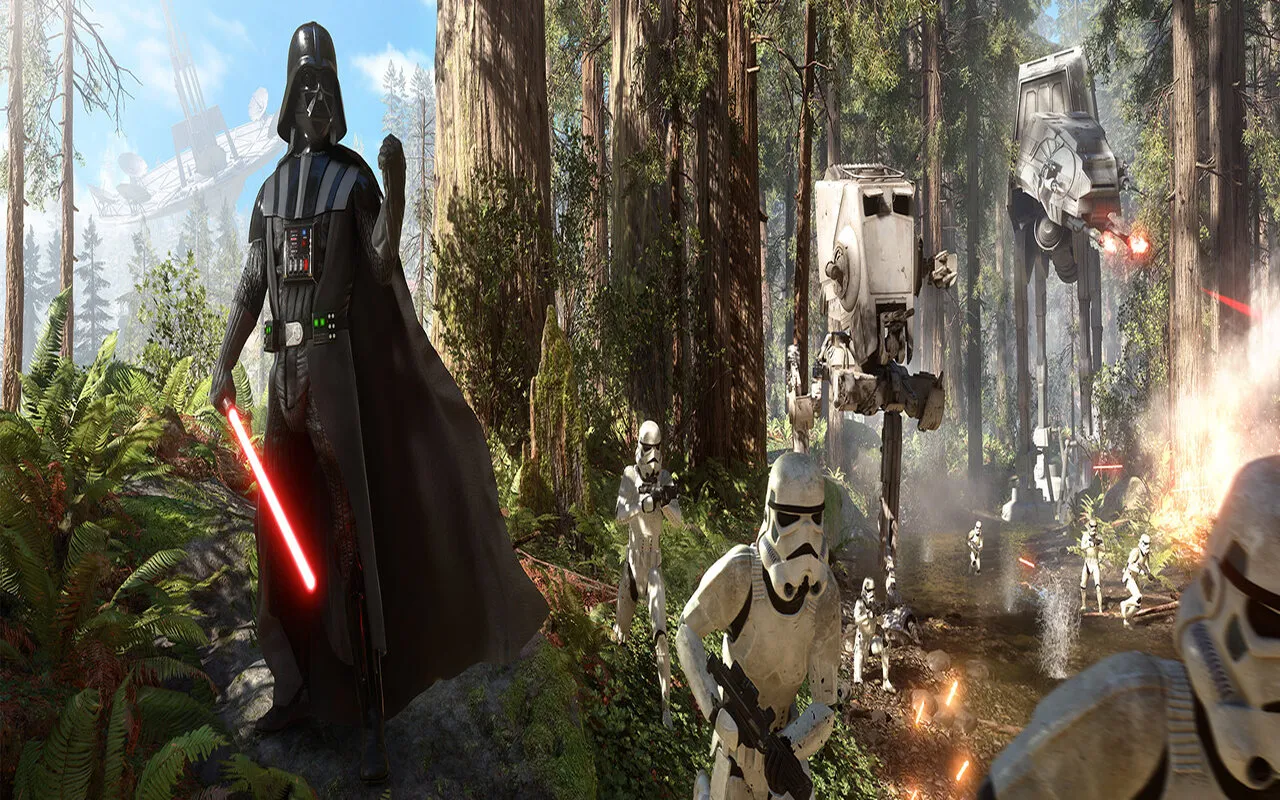
Have you ever thought, “Wow, this looks just like the movies” while playing Star Wars Battlefront?
That’s because the people who made the game took pictures of the real movie props and used them to make game stuff.
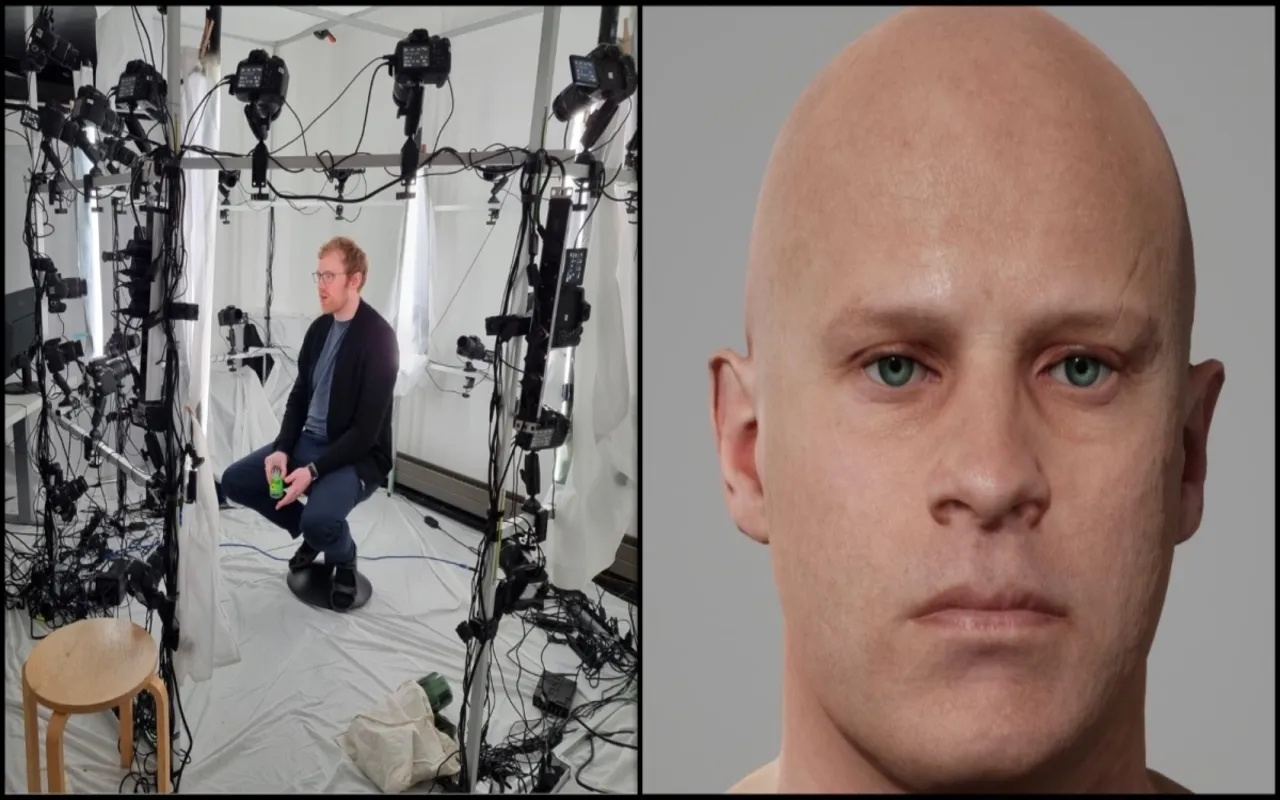
So, photogrammetry is when you’re teaching your computer how to be a detective. You show a lot of pictures of the same thing, like 200 pictures of a rock from every angle. It then figures out how to make a 3D version of the rock.
The whole thing works because cameras are honest. When an artist tries to make a brick wall look real, they guess how weathering works. But when you take a picture of a real wall that is 200 years old, you can see every crack, stain, and bit of character that nature made over the years.
Numbers are also true. This technology helped DICE cut its work time in half. The Astronauts team took 5,000 photos of each object instead of 200 because the results were so good. They even went all the way from Poland to New Zealand just to scan rocks.
How Is The Photogrammetry Process for Game Art?
The process is as follows:
Step 1: Get Ready for Your Photogrammetry Shoot
You need a good plan before you grab your camera and run outside like a happy tourist. Believe me, going with the flow will make you cry and waste time.
First, check out your area very carefully. You want even lighting, and cloudy days are best because harsh shadows mess up the software’s math.
You should also find out if you need permission to take pictures of certain things or places. It’s not fun to get kicked out halfway through.
- Think about these important things to plan:
- Stay away from bright sunlight and deep shadows.
- Some places require special permits.
- Everything is ruined by rain.
- Check the list of equipment, like batteries, memory cards, tripods, and cameras.
Apps that predict lighting conditions throughout the day are common in professional studios. For your first project, just try to get cloudy weather or controlled lighting inside.
Step 2: Take Pictures Like a Professional Photographer
It’s time for the photography marathon now. There should be a lot of overlap between the shots, sometimes even at least 60–80%. That means that most of the content in one photo is also in the next one.
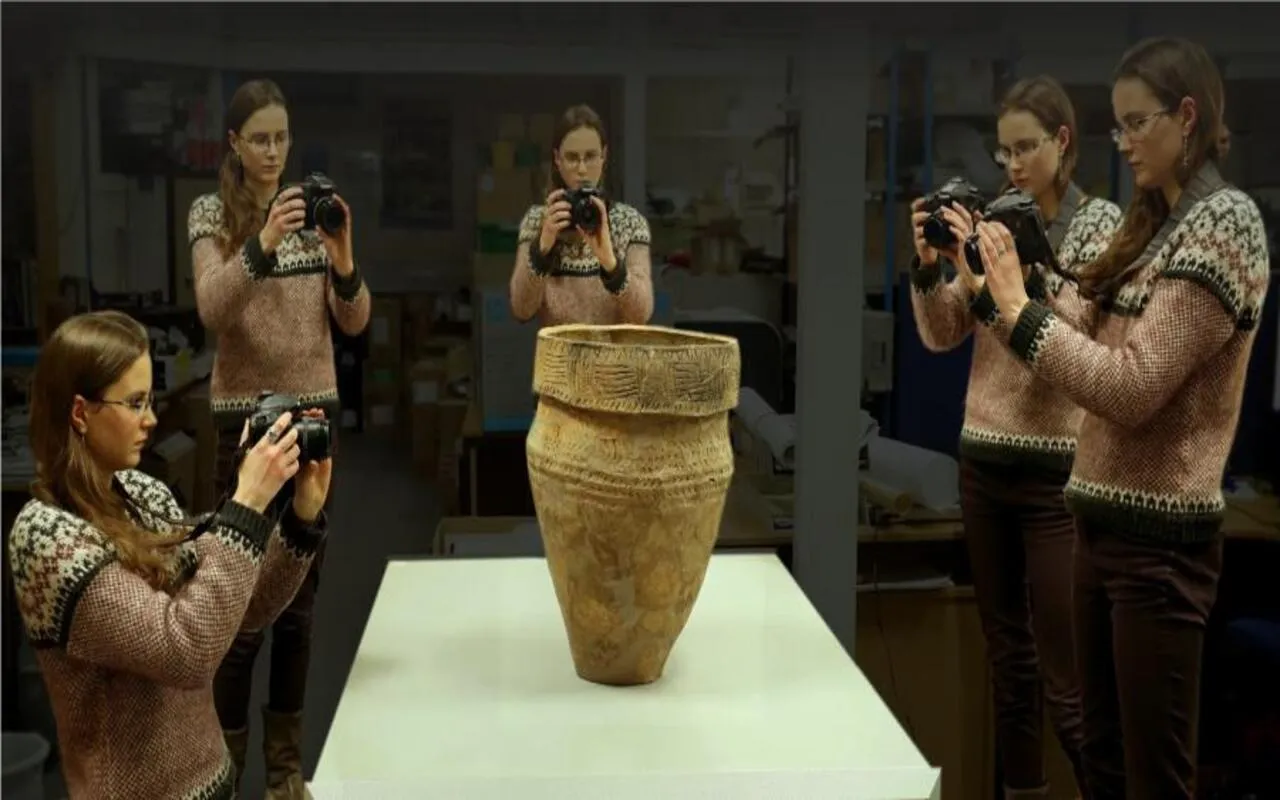
Then, walk around your subject in circles and take a picture every 15 degrees or so. After that, do it again at a different height. And once more.
The Astronauts team took between 180-300 photos for simple objects, while their record-breaking scan used 2,500 images combined with drone footage.
Important shooting methods:
- Keep the same settings on your camera and also lock the white balance, exposure, and focus.
- Use a lens with a 50mm focal length since this is the best place for photogrammetry.
- Keep your hands steady and remember that the whole process is ruined by blurry pictures.
- Write down everything that happened during each scan session.
A pro tip: Put a black card over your lens and take a picture of different things because it helps you organize your image sets later, which saves you hours of time.
Step 3: Turn Pictures Into 3D Models
You can import your photos into photogrammetry software like RealityCapture, which costs about $40 a month and works very quickly, or Agisoft Metashape, which costs about $179 for the standard version.
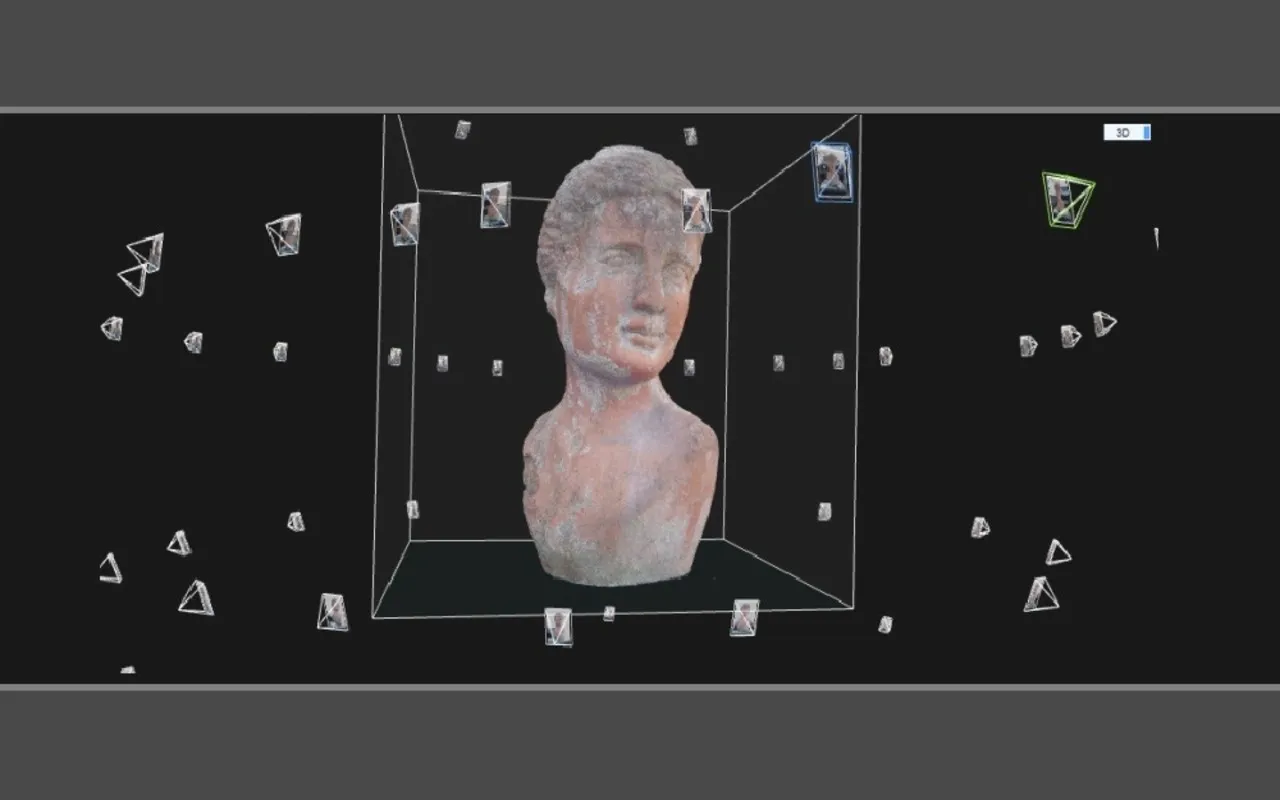
There are a number of steps that the software goes through. First, it lines up your photos by looking for features that are the same.
Then it makes a sparse point cloud that seems like a rough 3D sketch. The next step is the dense point cloud, which adds millions of points to make things more detailed.
Processing stages breakdown:
- Aligning images: 30 minutes to 2 hours, depending on how many photos there are
- Dense cloud generation: 2-8 hours for complex scans
- Mesh creation: 1-4 hours for detailed geometry
- Baking textures: 30 minutes to 2 hours for the last textures
Get ready to wait a long time since that scan of 2,500 images that broke the record, well, it made a model with 1.4 billion triangles, which probably took a few days to process. During this time, your computer might sound like a jet engine.
Step 4: Clean and Optimize for Games
Raw photogrammetry models are huge, with hundreds of millions of triangles in them. So, your graphics card would cry if it had to render that in real time. Now it’s time for the cleanup crew to do their job.
At first, you’ll cut the mesh down to a manageable size. Depending on how important it is, a typical game prop might use 5,000 to 50,000 triangles.
The best part here is that you can automate a lot of this process with tools like Blender or special plugins.
Optimization workflow is:
- Mesh decimation: Cut the number of triangles down by 90–99%.
- UV mapping: Unwrap the 3D surface for textures
- Texture baking: Move high-resolution information to normal maps
Cleaning up materials: Get rid of lighting information you don’t want. Studios like Embark have made their own Houdini tools that do this whole thing with just a few clicks. Most people, on the other hand, will have to do this by hand, which can take a few hours for each asset.
Step 5: Get Assets Game-Ready
The last step is to get your asset ready for the game engine. Nanite technology in Unreal Engine 5 has changed this process completely. You can now use models with millions of triangles without having to optimize them first.
However, most projects still need to be optimized the old-fashioned way. Also, make sure your model is the right size and orientation before exporting it as FBX or OBJ. Then, for the last step, import it into Unity or Unreal Engine.
Checklist for game integration:
- LOD creation: Different levels of detail for different distances
- Mesh for collisions: Simplified versions for calculations in physics
- Setting up materials: Set up shaders and texture maps
- Testing for performance: Make sure the frame rates are smooth
Photogrammetry assets can make visuals much better and cut creation time in half. That’s why Epic Games bought Quixel’s huge photogrammetry library and gave it away for free to people who use Unreal Engine.
Tools and Software for Photogrammetry
The market offers everything from free open-source solutions to professional-grade software costing thousands of dollars.
| Software | Price | Processing Speed | Ease of Use | Best For |
| RealityCapture | $40/month subscription | Extremely Fast | Moderate | Large projects, professional studios |
| Agisoft Metashape | $179 Standard / $3,499 Pro | Fast | Good | General purpose, small to medium teams |
| 3DF Zephyr | €149 Lite / €3,200 Pro | Moderate | Excellent | Beginners to professionals |
| Meshroom | Free (Open Source) | Slow | Challenging | Students, hobbyists, tight budgets |
| Pix4D | $350/month | Fast | Good | Aerial mapping, drone workflows |
How To Choose The Best Photogrammetry Tools?
- For Complete Beginners: Start with Meshroom since it’s free and teaches you the fundamentals. Moreover, you won’t cry if you mess up because you haven’t invested money yet.
- For Indie Game Developers: Agisoft Metashape Standard ($179) offers the best bang for your buck because it handles most game development needs without breaking the bank. Also, the learning curve is reasonable, plus extensive online tutorials exist.
- For Professional Studios: RealityCapture dominates here due to its incredible processing speed. Additionally, when time equals money, paying $40/month becomes trivial compared to artist salaries. Even better is that the software can process 2,500+ images while you grab coffee.
- For Drone Enthusiasts: Pix4D excels at aerial photogrammetry and large-scale mapping. Also, it integrates seamlessly with most commercial drones and GPS systems.
Advantages of Using Photogrammetry in Game Art
| Advantage | Traditional Modeling | Photogrammetry | Improvement Factor |
| Asset Creation Time | 3-5 weeks | 3-5 days | 5-7x faster |
| Surface Detail Level | Hand-painted approximation | Real-world perfection | Unlimited detail |
| Team Size Required | 3-5 artists | 1-2 artists | 60% smaller teams |
| Material Authenticity | Artistic interpretation | Physically accurate | 100% realistic |
| Learning Curve | 2-3 years mastery | 3-6 months proficiency | 4x faster skill acquisition |
Making Assets at Lightning Speed
When you’re trying to ship a game, time is everything. DICE figured this out pretty quickly: they cut the time it took to make Star Wars Battlefront assets in half by scanning real movie props. Not too bad for a day’s work, yes?
The Astronauts, on the other hand, went completely crazy with this. They went from spending weeks on character models to making them in just a few hours. To be honest, it’s like comparing a bike to a rocket ship.
This is what you really save:
- It only takes 2–3 hours to capture complicated objects instead of weeks.
- While you sleep, processing runs all night.
- There are a lot fewer rounds of revision because reality gets the details right the first time.
Jaw-Dropping Visual Realism
Hand-painted textures can never compare to real-world ones, and we can admit that there’s no competition here. Photogrammetry picks up on those tiny scratches, rust patterns, and wear marks that make players stop and look.
The reason Call of Duty: Modern Warfare looks like a movie is that they used real military equipment. Also, every bullet hole, dent, and paint chip came from gear that has been in real combat.
The improvements to the visuals are honestly crazy:
- Details on the surface that would take months to paint by hand
- Things that act like the real thing when light hits them
- No weird uncanny valley vibes since the beginning, real
Perfect Detail Preservation
Artists don’t bother with tiny details because they don’t have all the time in the world to model every crack and stain on a surface. But photogrammetry automatically captures everything, even things you missed.
For example, the Witchfire crew uses 42-megapixel cameras that can pick up details that you can’t see with your own eyes. That’s the reason why when players use a sniper scope to zoom in later, everything still looks perfect.
You win these details:
- No loss of detail due to time pressure or artistic shortcuts
- Every asset in your game is rock-solid and consistent.
- Models that will look great even on displays of the next generation
- Automating the workflow in a streamlined way
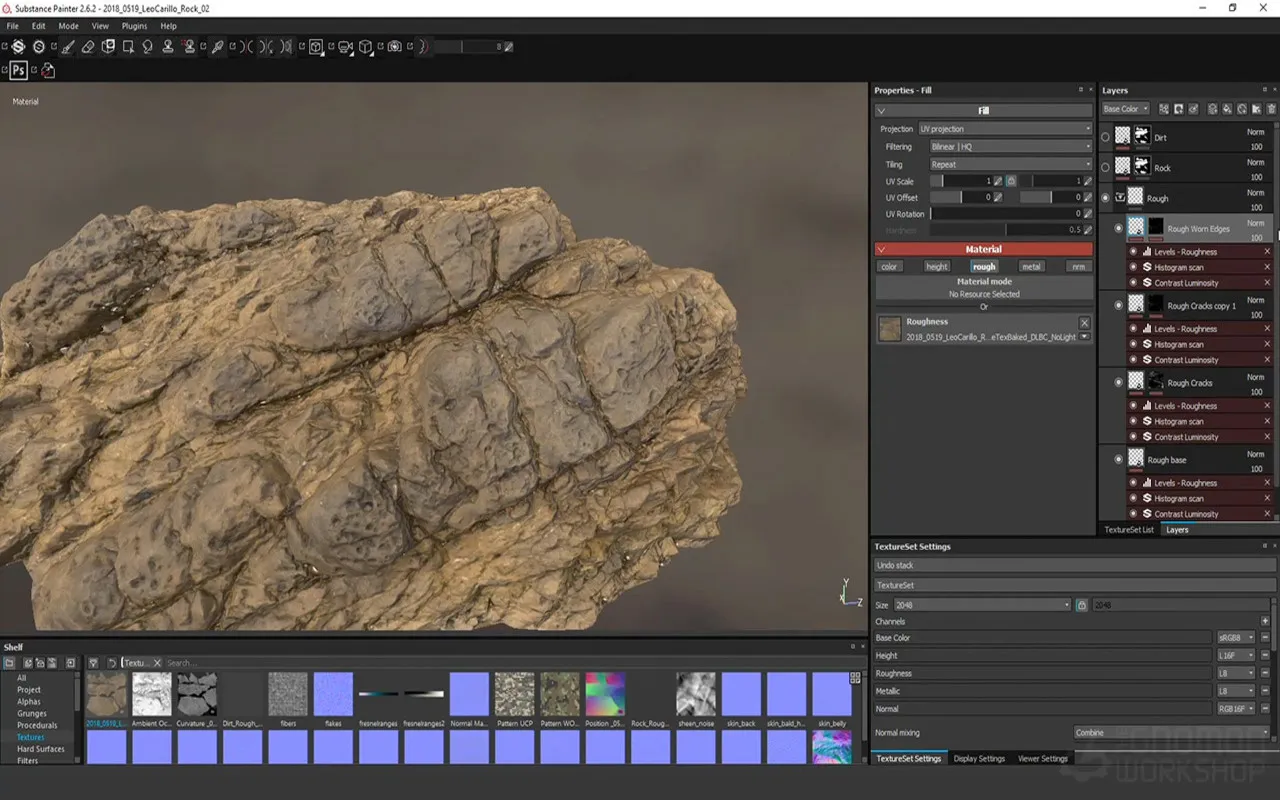
You don’t have to worry about the boring technical stuff with modern photogrammetry software. While you get your coffee, everything happens automatically: UV mapping, normal map generation, and texture optimization.
The Challenges of Photogrammetry Nobody Talks About
| Challenge | Impact Level | Typical Cost | Workaround Difficulty |
| Hardware Requirements | High | $3,000-8,000 PC setup | Moderate (cloud processing) |
| Processing Time | Medium | 2-48 hours per scan | Low (plan accordingly) |
| Storage Needs | High | 500GB-2TB per project | Low (external drives) |
| Lighting Issues | High | Reshoot entire sessions | High (weather dependent) |
| Software Crashes | Medium | Lost work time | Moderate (frequent saves) |
Hardware Will Make Your Wallet Cry
Photogrammetry needs a lot of computing power. The Astronauts team had to increase their RAM from 32GB to 128GB in order to run their ambitious scans without crashing.
A good photogrammetry workstation costs at least $5,000 to $8,000. Also, your electric bill will go up a lot because these machines run hot and loud for days at a time. Plus, one big scan can take up 200GB of space, so make sure you have enough room on your hard drives.
- High-end GPU: $1,500 to $3,000 (speed of processing is important)
- Lots of RAM: at least 64GB, but 128GB is better.
- Fast storage: NVMe SSDs for current projects and external drives for backups
Processing Time Tests Your Patience
Photogrammetry saves time overall, but it still takes a long time to process each scan. Complex objects might need 6-12 hours of computer time, during which your machine becomes basically unusable for other work.
Things to think about when managing your time:
- Plan for processing on weekends and nights
- Instead of one big project, start a lot of smaller scans.
- While processing runs, keep extra computers on hand for other work.
Weather Becomes Your Worst Enemy
Mother Nature doesn’t care what time you have to take pictures. Rain makes everything bad right away.
Shadows are terrible when the sun is too bright. It’s almost impossible to take pictures by hand when it’s windy.
Many professional photo shoots are put off several times while they wait for the right conditions. Photogrammetry works best on cloudy days, but you can’t plan for clouds weeks in advance.
Material Limitations Drive You Crazy
Some materials just won’t work with photogrammetry software because the algorithms get completely confused by shiny surfaces like chrome or mirrors. Also, materials that are clear become invisible.
Even professionals who have done it before have trouble with bad materials. You often need workarounds like powder coating or special lighting that changes how the object looks.
Some of the materials that cause problems include:
- Reflective surfaces: mirrors, polished metal, wet objects
- Transparent materials: glass, clear plastic, water
Quality Control Turns into a Nightmare
Bad models take bad pictures, and no amount of software magic can fix basic problems with capturing.
When coverage areas are missing, they leave holes that need to be fixed by hand, which is a lot of work. Even professionals sometimes have to do the whole thing over again when they find problems they didn’t see before.
If your scan has blurry pictures, bad lighting, or not enough overlap, it’s already doomed before it even starts.
How To Get Photogrammetry Assets Working in Your Game?
Modern game engines like Unreal Engine 5 and Unity have gotten much smarter about handling these massive models. Nevertheless, you still need to optimize things properly or your game will crawl along at 5 FPS.
Check Your File Format
First off, you’ll export your photogrammetry model as FBX or OBJ from your processing software. These formats carry both geometry and texture information, which saves you headaches later. However, make sure your scale is correct since nobody wants a coffee mug the size of a building.
- Scale everything to real-world units (meters work best)
- Check polygon count before exporting (aim for under 50,000 for props)
- Ensure UV coordinates are properly mapped
- Export textures separately as PNG or TIFF files
Unreal Engine 5 Makes Everything Easier
Unreal’s new Nanite technology completely revolutionizes photogrammetry workflows. You can literally import million-polygon models directly without traditional optimization.
Epic Games made Quixel’s entire photogrammetry library free for Unreal users. That’s thousands of professional-quality assets available instantly. Plus, the built-in Bridge plugin lets you browse and import assets directly inside the editor.
Nanite workflow benefits:
- No more painful LOD creation process
- Import original high-poly models directly
- Automatic optimization happens in real-time
- Performance stays smooth even with complex scenes
Unity Requires More Manual Work
Unity handles photogrammetry assets well, but you’ll need more hands-on optimization. The engine doesn’t have Nanite’s automatic magic, so traditional LOD creation and texture optimization become important.
Third-party plugins like Simplygon or InstaLOD can automate much of the optimization process. Otherwise, you’ll spend hours manually reducing polygon counts and baking normal maps.
Unity optimization checklist:
- Create 3-4 LOD levels for each asset
- Bake high-res details into normal maps
- Compress textures appropriately for target platforms
- Set up proper collision meshes for physics
Photogrammetry in Environmental Art and World-Building
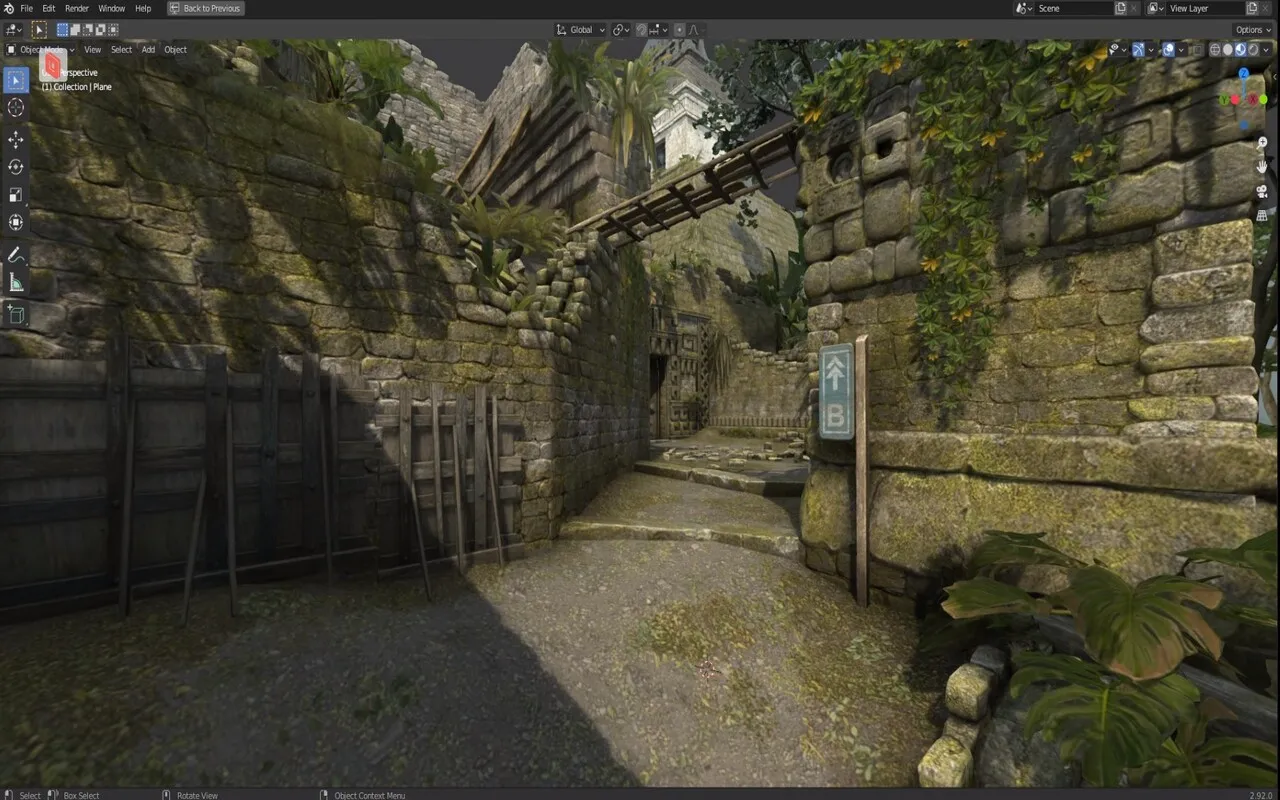
3D Environment artists have completely embraced photogrammetry because it solves the “everything looks fake” problem instantly and helps embed environmental storytelling into every game.
Landscape Scanning Workflow
The Astronauts team traveled over 2,000 kilometers from Poland to capture specific terrain types. They even went 17,684 kilometers to New Zealand for unique landscapes, and that’s serious dedication to authenticity.
Professional landscape workflow:
- Scout locations using satellite imagery and local research
- Use drones for aerial coverage of large areas
- Combine ground-level detail shots with overhead mapping
- Process multiple scans into seamless terrain sections
Modular Environment Kits
Smart studios create “environment kits” from photogrammetry scans. These are collections of walls, floors, roofs, and props that can be mixed and matched to build entire levels quickly.
DICE pioneered this approach for Star Wars Battlefront and scanned authentic movie props and set pieces. They built complete level construction kits that maintained visual consistency across all environments.
Kit creation strategy:
- Scan architectural elements separately (walls, doors, windows)
- Create tileable texture sets from larger surfaces
- Build modular pieces that connect seamlessly
- Maintain consistent lighting and material properties
Tools for Environmental Photogrammetry
Large-scale terrain requires different approaches than detailed architectural elements.
| Tool | Best For | Price Range | Learning Curve |
| DJI Terra | Drone mapping, large areas | $500-2,000/year | Moderate |
| Pix4D Mapper | Agricultural/survey mapping | $350/month | Easy |
| RealityCapture | Mixed aerial/ground workflows | $40/month | Challenging |
| Bentley ContextCapture | Infrastructure projects | $5,000+ | Professional |
Photogrammetry in Game Art Case Studies
Some games really did it well with photogrammetry, and they include:
Star Wars Battlefront II
The project needed to process over 60 terabytes of photographic data. That’s roughly equivalent to 15,000 hours of HD video.
Technical achievements:
- Scanned original costumes worn by actors in the films
- Recreated iconic locations with millimeter accuracy
- Combined prop scans with environment photogrammetry
- Achieved consistent visual quality across all assets
Results speak for themselves – players frequently commented that the game looked exactly like the movies. That level of authenticity would have been impossible with traditional modeling techniques.
The Witchfire
The Astronauts proved that small teams can achieve AAA visual quality using smart photogrammetry workflows. Their evolution from 200-photo scans to 5,000-photo masterpieces shows incredible dedication to craft.
They upgraded from 18-megapixel to 42-megapixel cameras specifically to capture finer details. Additionally, they switched from ground-based photography to drone workflows for better coverage.
Production scale comparison:
- Ethan Carter: ~100 scans, 200 photos each
- Witchfire: 10x more scans, up to 5,000 photos each
- Hardware: 32GB to 128GB RAM upgrade required
- Geographic reach: Poland to New Zealand expeditions
Call of Duty: Modern Warfare’s Military Realism
The studio discovered that photogrammetry enabled “tiling” processes that dramatically improved surface detail resolution. Every weapon, vehicle, and environmental piece came from real military equipment.
Innovation highlights:
- Combined traditional photography with drone capture
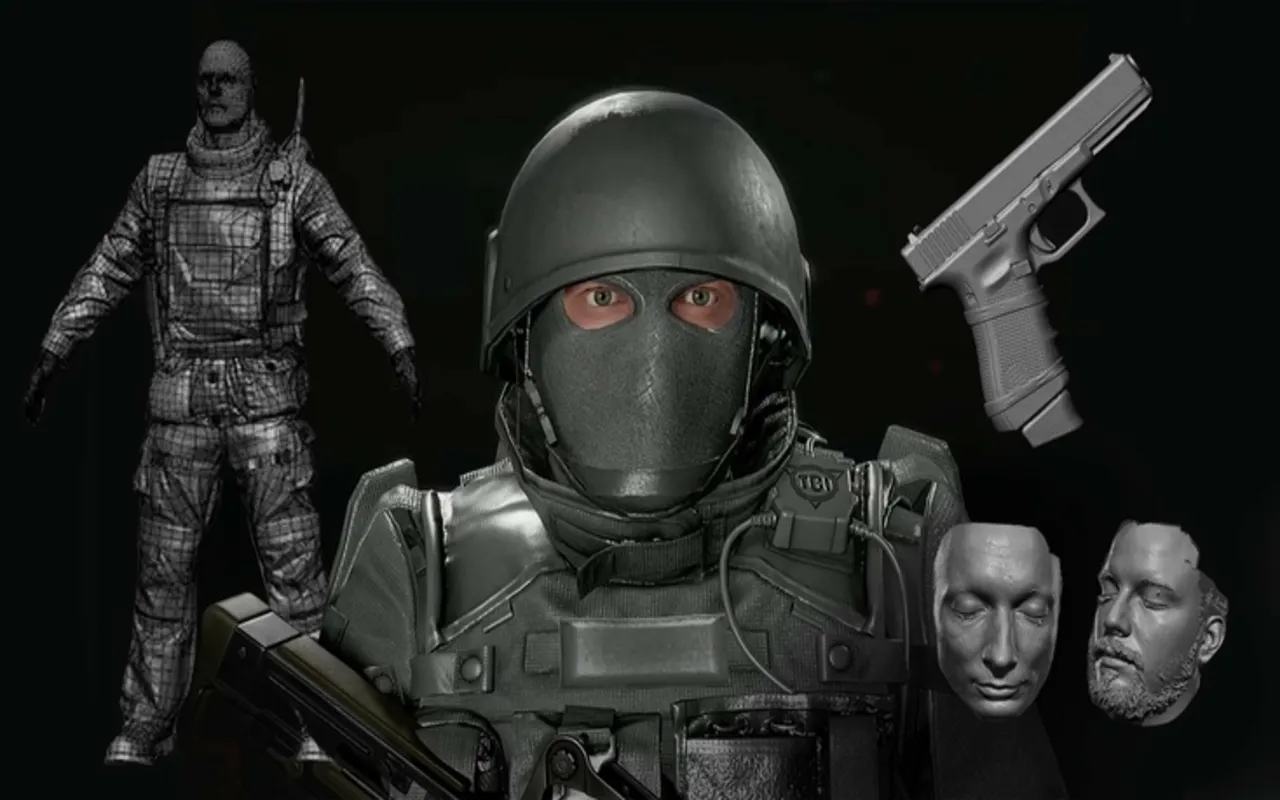
- Scanned actual military personnel for character references
- Used photogrammetry for weapon customization systems
- Achieved photorealistic lighting and material responses
World War 3
Previous character creation took weeks per model. But with their new scanning workflow, they create detailed characters in just a few hours – that’s roughly 10x faster production.

Workflow transformation:
- Traditional approach: 3+ weeks per character
- Scanning approach: 3-4 hours per character
- Quality improvement: Higher detail and authenticity
- Cost reduction: 60% fewer artist hours required
Final Thoughts
Photogrammetry is just really clever technology applied to an age-old problem. Games need to look realistic, but traditional methods take forever and cost too much. Photogrammetry bridges that gap beautifully.
Whether you’re a complete beginner or seasoned 3D artist, this technology offers something valuable.
Smart advice for getting started:
- Don’t overthink the equipment and start with what you have
- Focus on understanding the fundamentals before chasing fancy software
- Join online communities where people share tips and troubleshoot problems
- Build projects that genuinely interest you rather than following tutorials blindly
The future belongs to artists who can blend traditional skills with emerging technology. Photogrammetry represents exactly that blend with part photography, part 3D modeling, and part technical problem-solving.