Creating a storyboard involves breaking your script or concept into key scenes and sketching simple panels to represent each important moment or shot. A storyboard is a visual depiction of the shot-by-shot progression of your video. Each shot is represented by a square with a picture along with comments describing what’s happening in that scene. A storyboard serves as your road map for what happens in a visual narrative. The purpose of this article is to demonstrate how to create a storyboard. The article concludes with some tips and techniques for making your ideal storyboard.

Need Animation Services?
Visit our Animation Service page to see how we can help bring your ideas to life!
How to Make a Storyboard in 6 Steps?
Creating a storyboard is a great way to help with the creative process, whether you are making an animation film or video game. It’s also the fourth step in the 3D animation pipeline. The steps below will provide you with a general outline of the process.
1. Establish a Narrative
It is important to start out by defining a narrative. You’ll be able to see what should be included in the storyboard once you have written a synopsis to help you out.
2. Identify the Crucial Moments of the Story
After you’ve defined the story, the next step would be to identify key moments that are significant to the story. These key scenes are like building blocks and will be used to hold up the storyboard, and they are the scenes that will be illustrated in the storyboard.
3. Make Sketches of the Scenes
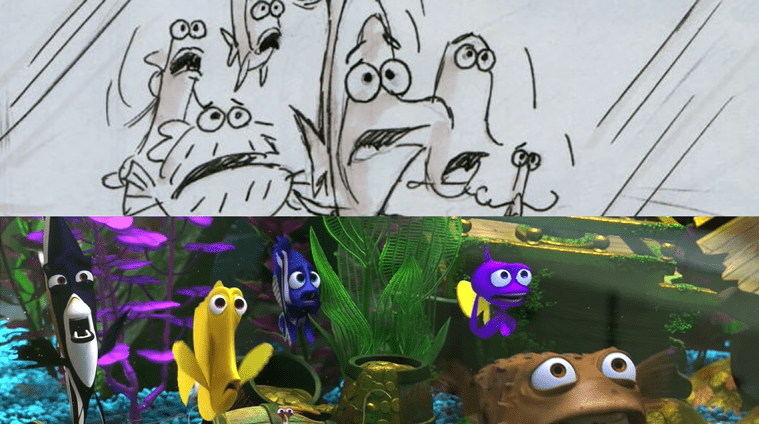
The third step in creating an animation storyboard is sketching out the scenes. It is an integral part of creating a storyboard because it helps visualize the story and its characters. The sketches should be simple, and they should be able to convey the main theme of the story, key actions, and emotions of the characters.
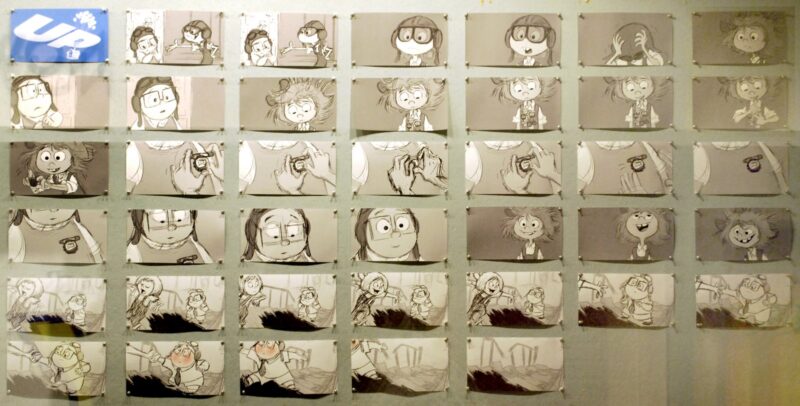
4. Lay Out the Sketches
Next, you must arrange the sketches in a linear format according to the chronological order of the story. The arrangement should be straightforward and easy to follow.
5. Adding Dialogue and Text
In this step, you can add dialogue and text to different types of storyboards. Bear in mind that the dialogue and text should be written in a clear and concise manner and must be placed within the appropriate panel.
6. Refine the Storyboard
Refining a storyboard is the last step in creating a storyboard. In this stage, the storyboard is reviewed, and necessary changes are made. The refinement stage is crucial since it plays a critical role in ensuring that the final storyboard represents the story accurately.
Storyboarding Techniques You Need to Know
A storyboard is a powerful tool for planning out the details of a story. If you are creating a storyboard for a film, video game, or any other kind of creative project, the following are some techniques that you can use:
1. Storyboard Layering
The storyboard layering process involves creating a series of panels and frames to depict a story or script. Each layer represents a specific element of the scene, such as characters, backgrounds, props, or special effects. Layers are placed on top or beneath other layers to create composite images. This technique allows artists and designers to break down the story into smaller and more manageable parts.
It also involves rearranging the order of panels or adding extra panels to clarify the action or dialogue. Layers may be added or removed to ensure that the final image accurately represents the vision of the director or writer. By using storyboard layers, technical details such as camera angles, shot types, lighting, and other technical aspects of the scene can be communicated.
2. Shot Types
The shot types basically refer to the various visual techniques used in storytelling through film or animation. They help convey the mood, emotions, and narrative of a story. Some common shot types are listed below:
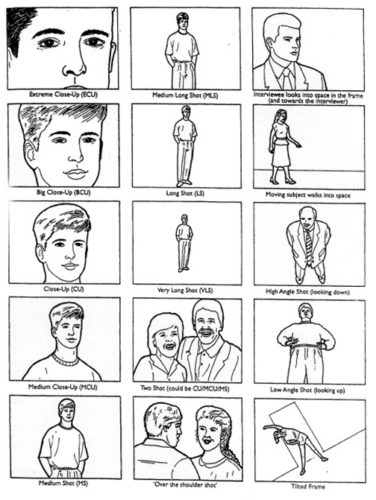
ECU or Extreme Close-up
This shot is intended to communicate strong emotions or to highlight details on a small part of an object or a person.
CU or Close-up
Using this shot, you can capture a person’s emotion or reaction from the shoulders up.
MS or Medium Shot
Also known as the mid shot or waist shot, this type of shot is often used to introduce a character or to show interactions between them.
WS or Wide Shot
This shot establishes the setting of a scene by taking a complete shot of the subject.
EWS or Extreme Wide Shot
This shot captures a large area, such as a landscape or cityscape, to set the context of the story.
OTS or Over the Shoulder
This shot captures a character from behind another character’s shoulder. It is used to show the interaction between two characters.
POV or Point of View
A shot in which the audience sees what a character sees.
LA or Low Angle
Taking a shot from a low angle, looking up at the subject, can give the subject a more powerful or imposing appearance.
HA or High Angle
In this shot, the subject is seen from above, appearing smaller and weaker.
3. Camera Movements
In storyboarding services, camera movements play an important role in creating a visual narrative, and they convey a sense of action, emotion, and drama, as well as set the tone and pace of the scene. Here are some common camera movements that are often used in storyboarding:
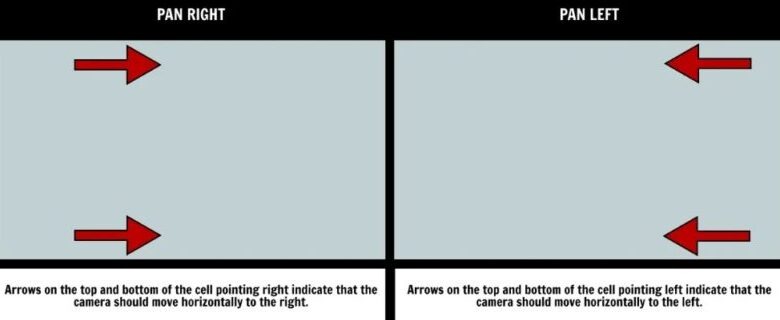
Pan
This is when the camera pivots from left to right or vice versa, showing what’s going on in a wider space, like a room or a landscape.
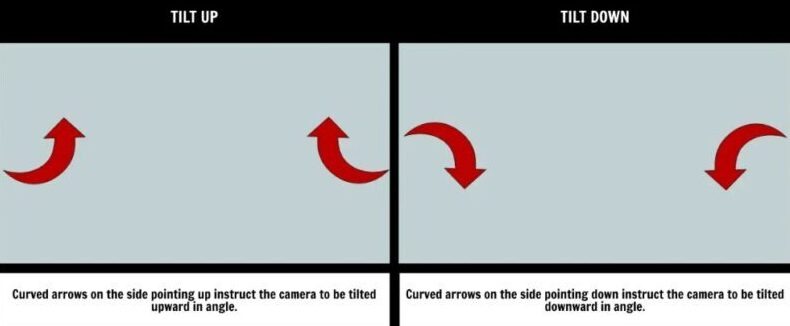
Tilt
Tilting is the vertical movement of the camera that shows the character’s reaction to something or reveals something above or below the character.
Zoom
By zooming, the camera lens is adjusted in a way that makes the subject appear closer or farther away. It’s used to emphasize emotion, such as making a character’s face larger in a frame.
Dolly
In dolly shots, the camera physically moves closer or farther away from the subject, creating a sense of movement.
Tracking
In this shot, the camera follows the subject as they move. Tracking shots create a sense of motion and make the viewer feel part of the action.
Crane
In crane shots, the camera is mounted on an elevated platform to provide a wide-angle view or create dramatic effects.
Steadicam
A Steadicam shot is when the camera is mounted on a stabilizing device and follows a character through a scene, giving a fluid and smooth shot of the character.
What Does an Storyboard Need?
Storyboards are often created using pencil drawings or simple digital illustrations, providing development teams with a better understanding of the concept, plot, characters, scenes, actions, and so forth. There are five key elements that make up a storyboard:
1. Shot and Scene
Your storyboard is divided into several scenes. Scenes are labelled with titles and numbers (e.g., Opening Scene, S1), and each shot within each scene is numbered as well. For example, S1.6 means scene 1, shot 6.
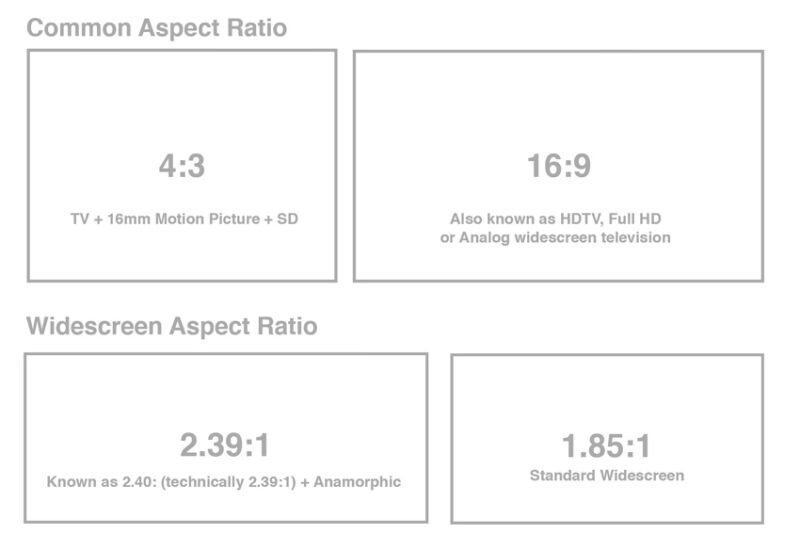
2. Panel
A panel represents a single action or moment in a storyboard. Each drawing has its own panel. The shape of the panel refers to the aspect ratio of the production.
3. Sequence
An entire sequence is composed of multiple shots that will be filmed simultaneously at the same time and/or at the same place. A sequence of shots together forms what we call a complete scene.
4. Description
The description on each panel is a caption that describes the action that is happening. This can include everything from actions to dialogues to other details related to that specific scene.
5. Camera Movements
Additionally, the panels may also designate which shots the camera operator should focus on (close-up, wide shots, etc.), as well as which direction the camera ought to take.
Top 5 Storyboarding Software
Both hand-drawn and digital storyboards have their advantages and disadvantages, so you should choose based on your needs and preferences. Some artists prefer the tactile experience of hand drawing, while others prefer the convenience and efficiency of digital tools. The following are some of the most popular storyboard software options available today:
Tips to Make Great Storyboards
Here are some useful tips that help you plan out your storyboard with clarity and precision:
1. Start Rough and Define the Structure First
Sketch out your storyboard first. Focus on the composition and blocking without getting too caught up in details. Don’t forget to create an outline or script for your storyboard.
2. The Focus Should be on Storytelling
Storyboards are essentially the visual representation of the story, so the focus should not be taken away from the storytelling. It is crucial to create a clear and compelling narrative arc.
3. Your Storyboard Should Be Accurate
Take your time to plan out everything. The level of talent in drawings doesn’t matter. It’s the content of drawings that matters. So, draw clearly, use diagrams, be careful with the choice of staging, and don’t forget the expressions. You can also check out our blog for more information on character design. Ah! Almost forgot! Use planes. Using criss-cross lines will help you ground characters, establish perspective and determine the camera angle.
4. Set the Mood with Color and Shading
Color can be an important element in storyboarding as it can help in establishing moods, differentiating characters and objects, highlighting important elements, and creating contrast. Overall, colors and shading in storyboarding can serve as powerful tools for conveying information and setting the tone of the scene.
5. Embrace Feedback
It will help you identify areas to improve your storyboard, as well as ensure that you effectively communicate your ideas with your storyboard.
Conclusion
In summary, this conclusion reiterates the key steps covered in the post – sketching shots, adding descriptions, polishing panels, allowing for creative iterations, and maintaining clear organization. It emphasizes that storyboarding is an evolving, creative process that lays the groundwork for visual storytelling. The paragraph motivates aspiring storyboarders to dive in and develop this important skill for bringing their visions to the screen.