It can really feel like a challenge to create amazing games when your art team and design team aren’t seeing eye to eye.
Artists will one day create a breathtakingly beautiful castle level. Then, the designers give it a go and realize that players are totally getting lost when they try to find the main door.
This specific problem takes down more indie games than poor coding or uninteresting plots. Plus, if they wait to fix it, studios end up spending around 6 extra months on the job. But, you know, clever teams found a smarter approach a while back.
The secret is to inspire both teams to collaborate from the very beginning of the planning process. Also, using straightforward communication tools can really help everyone avoid a lot of headaches later on, especially when working with game art service providers who must integrate design and art goals seamlessly.
What Exactly Is Level Design?
Level design is all about making places where players can have a great time. Don’t you just love those incredible times when you’re gaming and everything clicks perfectly? That’s some impressive level design at play!
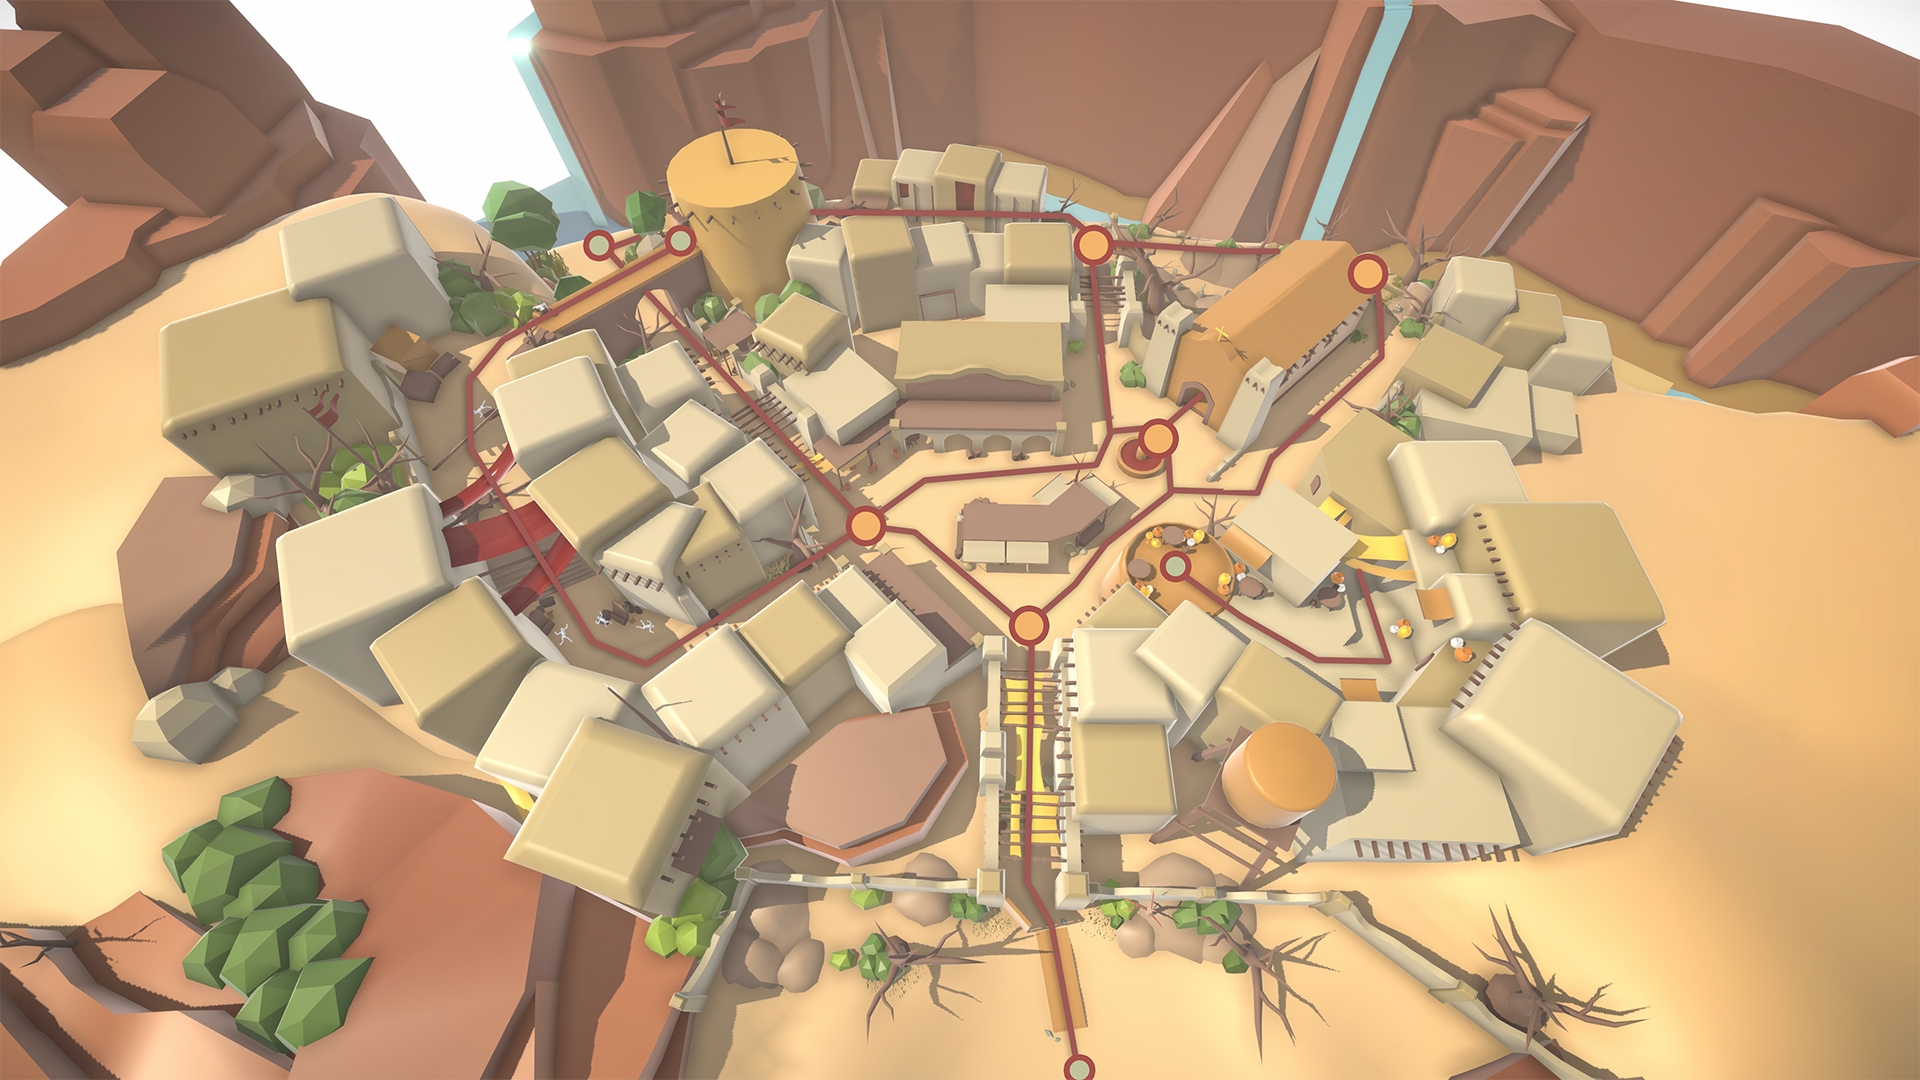
Level design influences everything a player experiences. It determines their destination, what they experience, and the emotions they have while playing.
Take a moment to think about your favorite game. What made it memorable for you? It’s likely that it wasn’t only the nice visuals or interesting characters that caught your attention. It was probably all about how the levels made you feel—excited, curious, and maybe just a bit scared.
So, let me tell you what goes down when level design really hits the mark:
- Players have a clear idea of where to head without any confusion.
- Every area has its own unique vibe and keeps things exciting.
- It gets harder as people get better on their own.
- Every corner shares a piece of your game’s story.
So, what happens when it doesn’t work? Sometimes players find themselves feeling lost, frustrated, or even a bit bored. They’ll bail on your game quicker than you can shout “game over”.
Examples of Level Design
Let’s check out some games that really get level design right!
| Game | Art Style | How Art Helps Gameplay | Integration Success | Why It Works |
| Super Mario Bros | Bright cartoon | Colors show what’s safe vs dangerous | Perfect | Simple colors teach rules fast |
| Portal | Clean white lab | Nothing distracts from puzzles | Amazing | Less stuff = clearer thinking |
| The Last of Us | Realistic decay | Broken things guide your path | Excellent | Props show story and direction |
| Mario Galaxy | Colorful space | Bright planets = safe gravity zones | Brilliant | Art matches physics rules |
| Hollow Knight | Dark hand-drawn | Light always shows the way. | Outstanding | Beautiful but never confusing |
| Celeste | Clean pixel art | Sharp pixels = precise jumps needed | Perfect | Art style matches difficulty level |
| Ori and the Forest | Painted fantasy | Blue glow = save spots, orange = energy | Beautiful | 3 colors teach everything |
Why Does Art Integration Matter for Level Design?
These days, a lot of games look great, so why stress about how art fits in? Because games with nice graphics aren’t always good games.
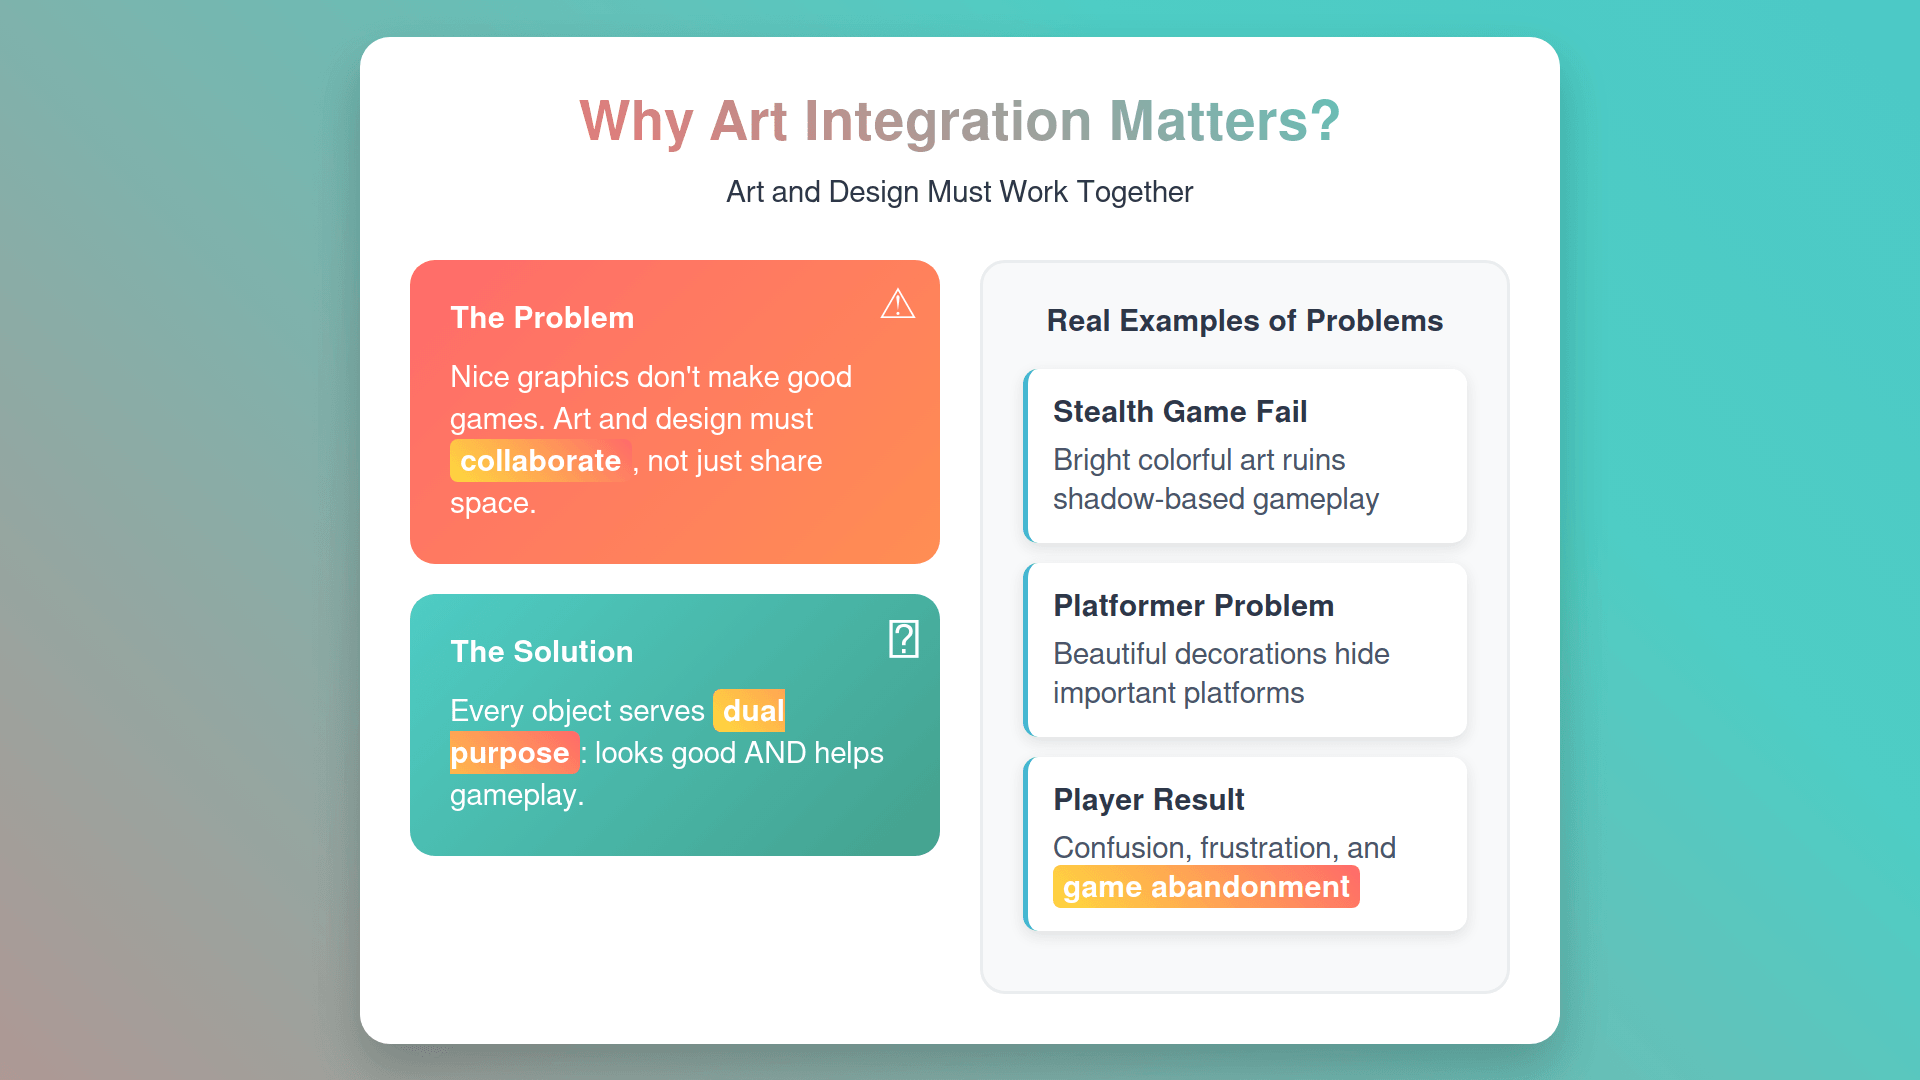
Art and level design really need to collaborate, rather than just sharing the same space.
Let’s say you’ve created an awesome stealth level where players have to blend into the shadows. But then the art team goes ahead and makes everything bright and colorful because they think it “looks better.” And in the end, out of nowhere, your stealth game just stops working.
Or maybe you’ve put together a platformer level that features some tricky jumping challenges. The art team adds some really beautiful decorative elements that end up covering important platforms. As a result, players are having a tough time finding out where to jump now.
How Is the Integration of Art in Level Design?
Art integration happens with every move players make through your level. It’s not enough to just throw in some nice visuals after you’ve already set up the gameplay. In fact, it’s important for both parties to collaborate right from the start.
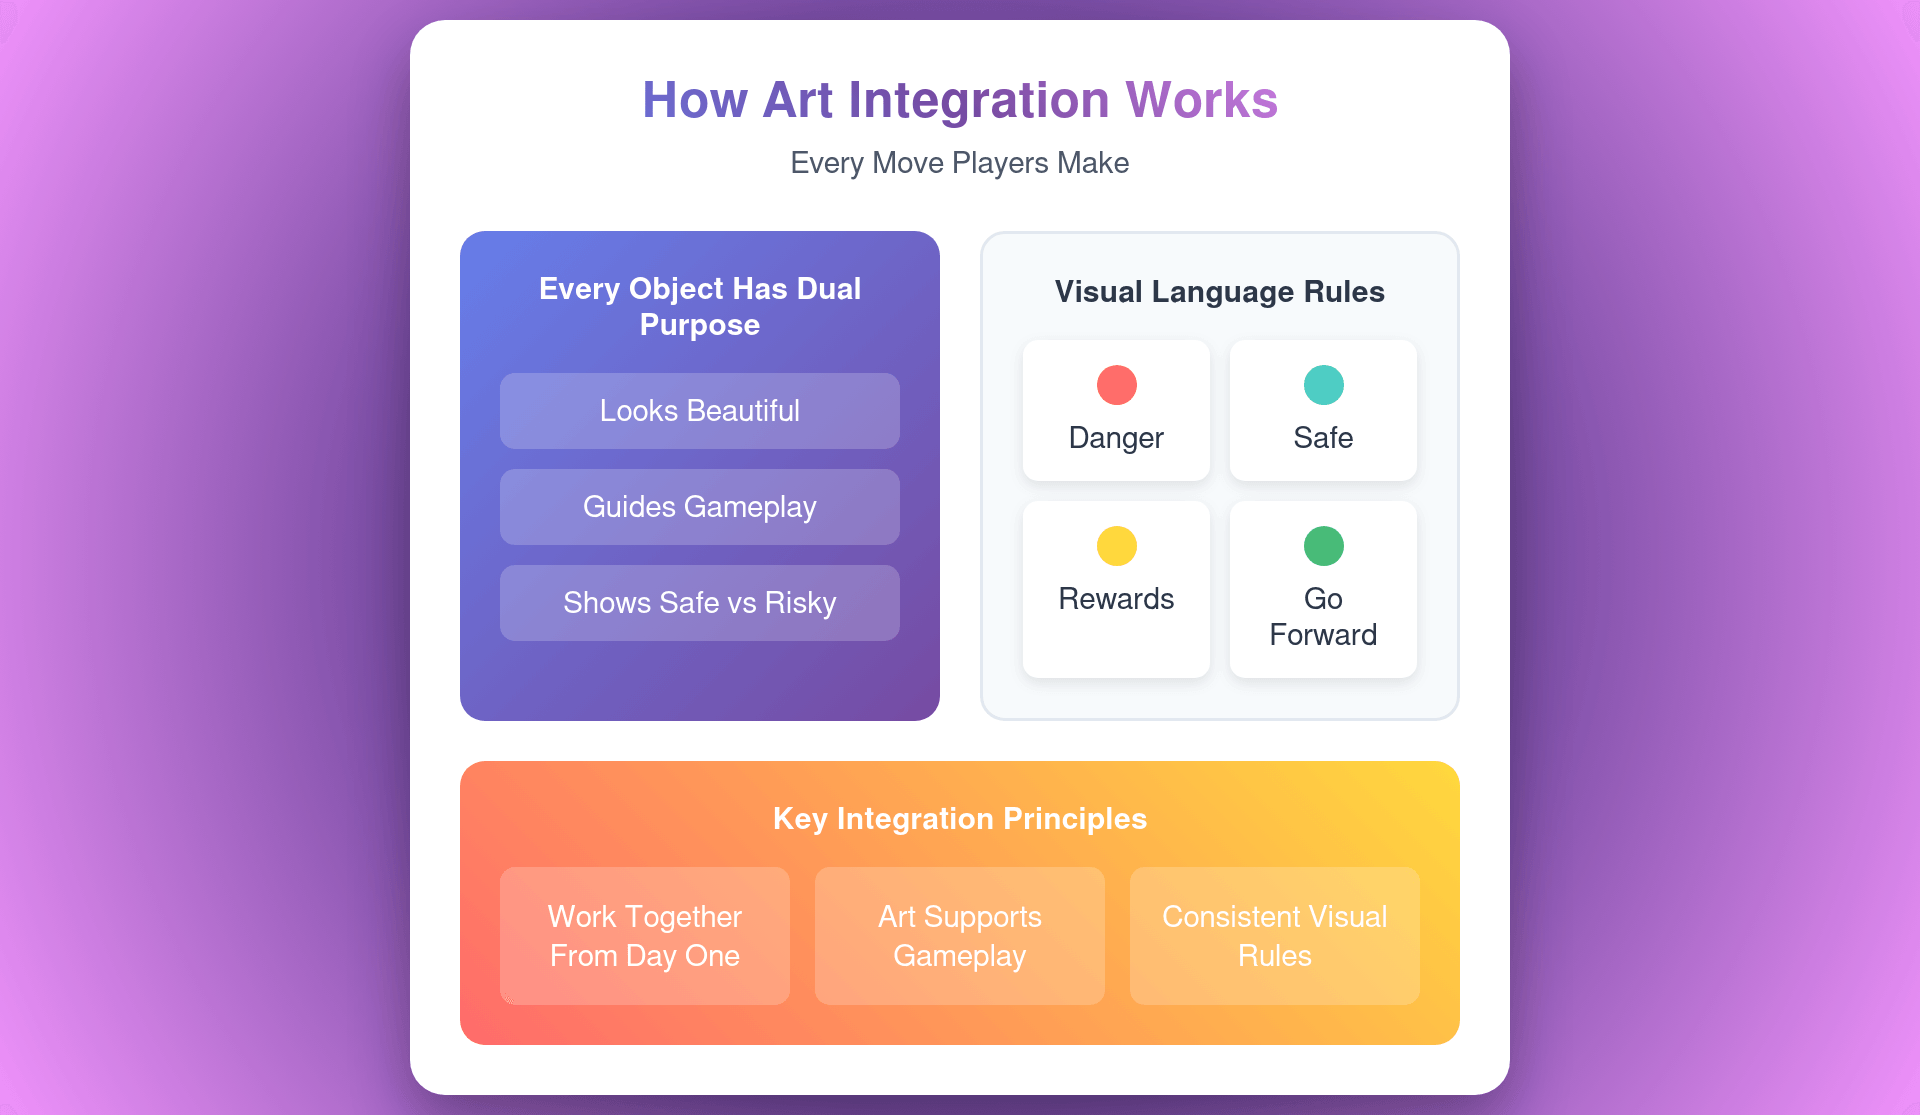
Every object serves a dual purpose:
- It’s visually appealing for the art style.
- Helps players get an idea of the gameplay and points them in the right direction for what to do next.
- Highlights what’s safe and what’s risky.
Take that route, rock as an example. Of course, it really does look nice! But it also keeps you out of sight of your enemies. What about those flowers by the bench? They point out the safe spots where you can save your game.
Unspoken Visual Language
Your art sets up rules that players pick up quickly. Red things can be painful, and blue stuff really boosts your energy. Once players get the hang of these rules in level 1, they stick around for all 20 levels.
| What You See | What It Means | What Players Do |
| Golden glow | Safe to touch | Walk over and use it |
| Red spikes | Will cause damage | Stay away or get protection |
| Broken paths | Hard section coming | Get ready for the challenge |
| Warm light | Safe resting area | Stop and explore |
A Complete Level Design and Art Integration Workflow
Art and design must be combined in a precise way. So, if you skip any step, the amazing art could mess up the gameplay, or the great design might end up looking bad.
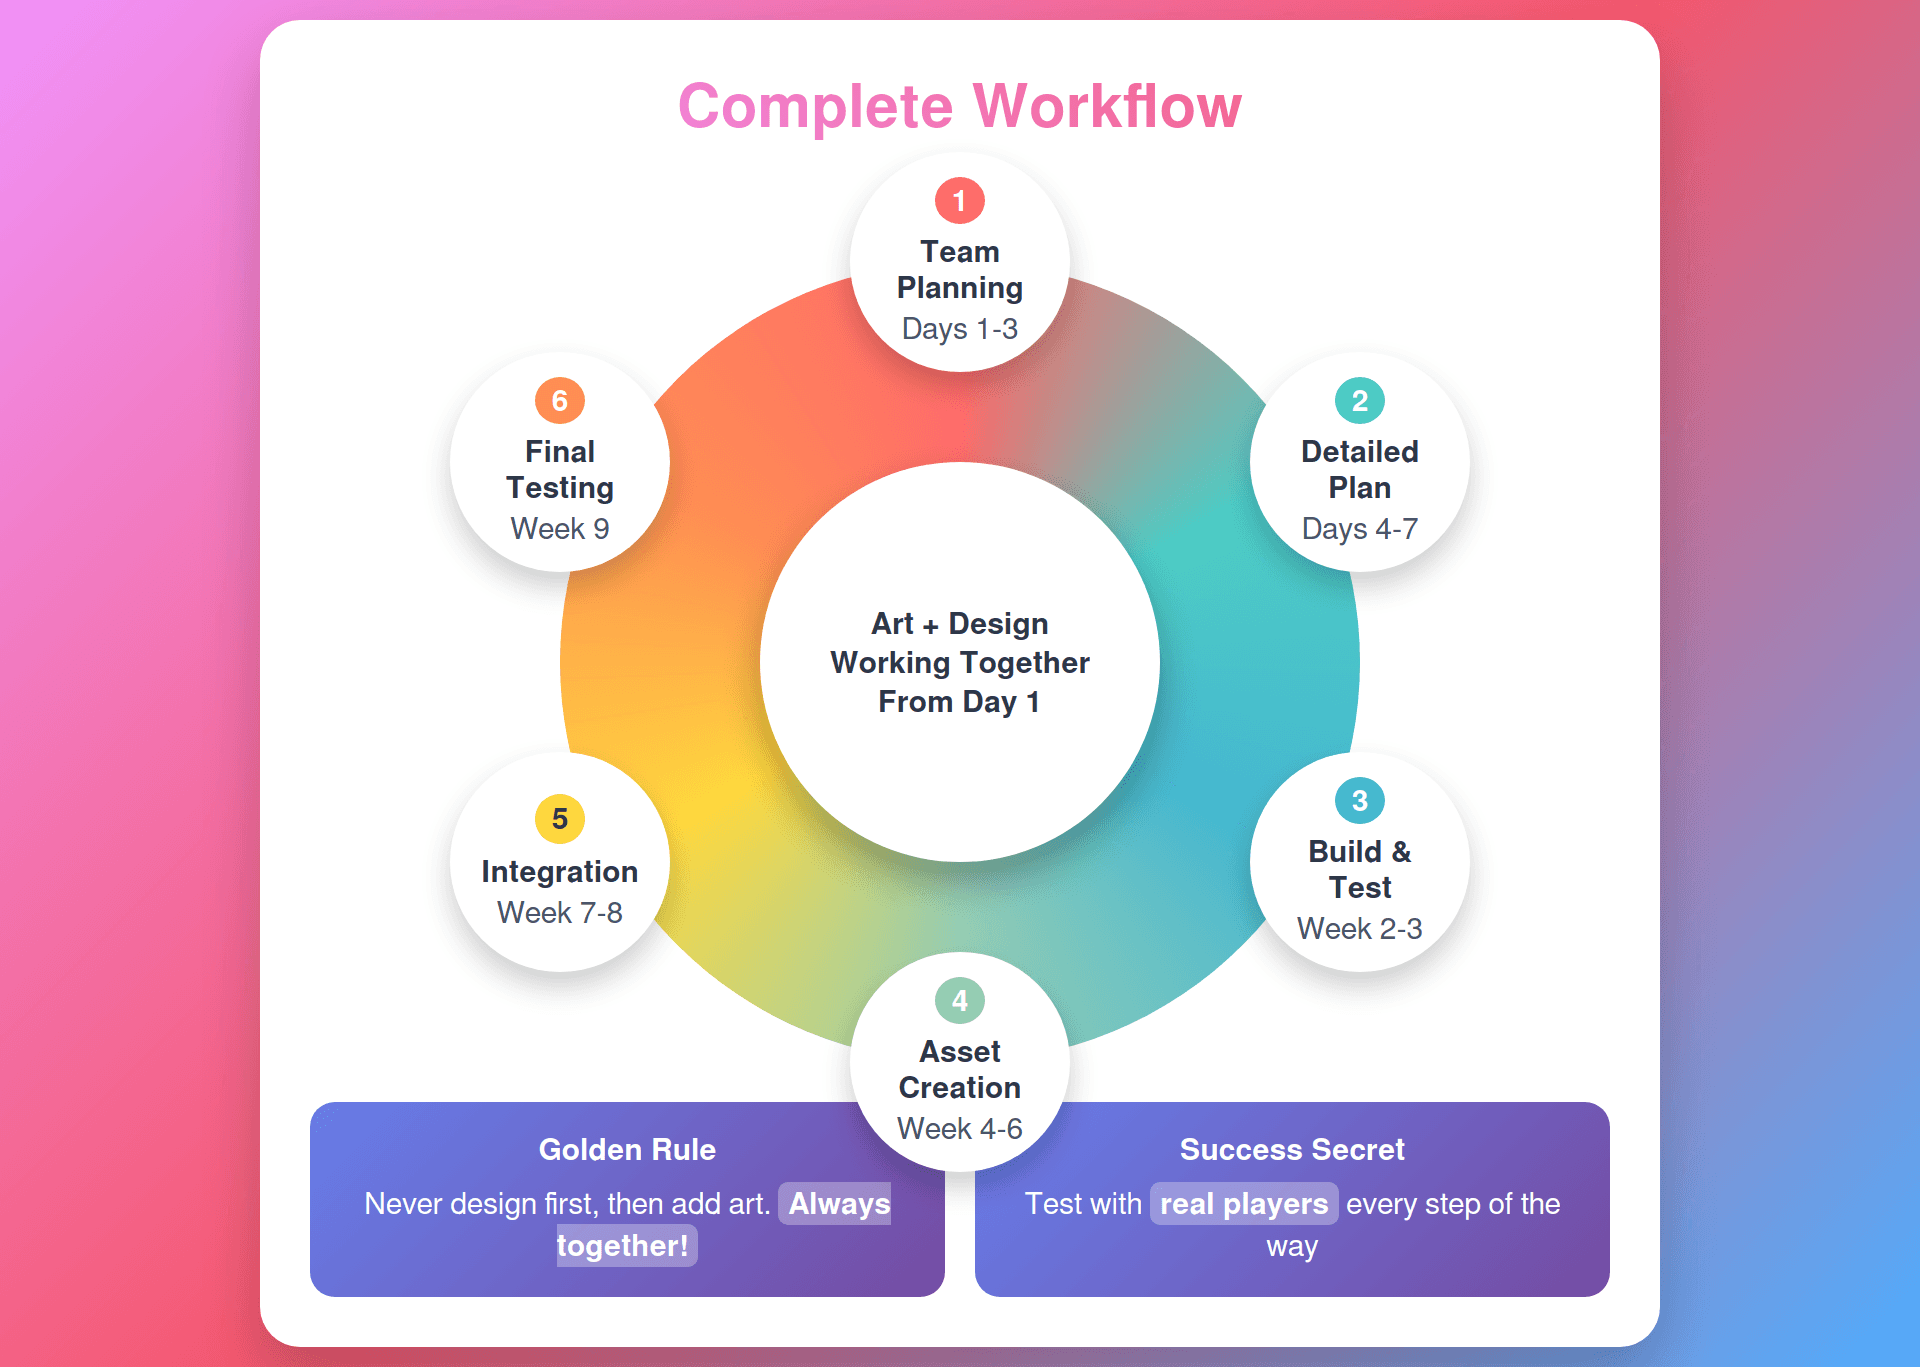
Step 1- Team Planning Together (Days 1-3)
Designers and artists work together in the same room. Everyone’s in this together during this phase.
Here’s what goes on every day:
- Day 1: Talk about the emotional goals, such as whether the players are scared, excited, or interested.
- Day 2: They draw rough ideas together as a group; not just artists should draw.
- Day 3: The team chats about what visual and gameplay elements they should focus on first and what elements are most important.
The result: One shared document everyone agrees on
Step 2: Detailed Planning Phase (Days 4-7)
Both teams plan art and design elements at the same time. Never design first, then add art later.
Daily tasks breakdown:
- Create level layouts with art notes included
- Plan lighting schemes and color palettes together
- Set technical limits, like how many objects per room?
- Make lists of needed art assets
Deliverable: Complete blueprint with both art and design specs
Step 3: Build and Test Together (Week 2-3)
Artists create basic versions while designers build playable layouts.
Week 2 Focus:
- Build a greybox level with simple shapes
- Test 3-4 key art pieces in the actual level
- Check performance with placeholder art
- Get feedback from 5-6 fresh players
Week 3 Focus:
- Fix major problems found in testing
- Refine art pieces that didn’t work
- Adjust the level layout based on the art needs
- Test again with updated versions
Deliverable: A Working level that proves art and design fit together
Step 4: Asset Creation Phase (Weeks 4-6)
Artists make final assets while designers fine-tune gameplay.
- What artists do: Create assets based on exact gameplay requirements
- What designers do: Test each new asset as soon as it’s ready
- What both do: Make changes quickly when something doesn’t work
Deliverable: All major game assets created and tested in-game
Step 5: Integration and Polish (Weeks 7-8)
Everything comes together during these 2 weeks. This stage really calls for everyone to work together.
Week 7 – Integration:
- Put all final art assets into the level
- Adjust lighting to support both beauty and gameplay
- Optimize performance – aim for 60 FPS on target hardware
- Fix any art-design conflicts that pop up
Week 8 – Polish:
- Fine-tune lighting and particle effects
- Balance gameplay with new visual elements
- Performance optimization round 2
- Bug fixes and final tweaks
Deliverable: Complete level ready for final testing
Step 6: Testing and Final Fixes (Week 9)
Test the complete experience with real players and make final adjustments based on their feedback.
Testing schedule:
- Days 1-3: Get 10-15 people to play the level
- Days 4-5: Analyze feedback and plan fixes
- Days 6-7: Implement the most important changes
Deliverable: Finished level ready to ship
How To Choose the Right Art Style for Your Level?
Different kinds of games need different ways to look at them. A horror game that has cartoon graphics likely won’t give anyone a scare. Meanwhile, a chill puzzle game that throws in some realistic blood is sure to leave players scratching their heads.

Here are some game genre and art style combinations that really work well together:
| Game Type | Best Art Styles | Why It Works |
| Platformers | Cartoon, Pixel Art | Clear shapes, readable at speed |
| Horror | Realistic, Dark | Creates believable fear |
| Puzzle | Clean, Minimal | Reduces visual distraction |
| Action | High Contrast | Easy to see important elements |
| RPG | Fantasy Realistic | Supports world-building |
For Fast-Paced Games (Racing, Shooters): You need high contrast and clear shapes. Players make split-second decisions, so everything important must be obvious immediately. When things move fast, those little details can easily slip away.
For Exploration Games (Adventure, RPG): Rich, detailed environments work great here since players have time to look around and appreciate artistic touches. Plus, you can hide secrets in visual details.
For Puzzle Games (Match-3, Brain Teasers): Keep it simple and clean because too much visual noise makes it hard to think clearly. It is better to use color theory and shape to communicate game rules instantly.
Your Art Style Decision Framework

Step 1: Know Your Core Audience:
- Kids prefer bright, simple styles
- Teens like edgy, detailed looks
- Adults appreciate subtle, sophisticated art
- Casual players need clear, readable visuals
Step 2: Consider Your Technical Limits
- Mobile games need simpler art for performance
- PC games can handle more complex visuals
- Console games fall somewhere in between
- VR needs special consideration for motion sickness
Step 3: Think About Production Reality
- Realistic art takes much longer to create
- Stylized art is faster and often ages better
- Pixel art requires specific skills, but renders quickly
- Hand-painted art looks unique, but needs talented artists
7 Tips and Tricks for Level Design and Art Integration
Making art and level design work well together depends on a few clever techniques. Lots of games have put these techniques to the test.

1- The 3-Layer Building Method
Build levels in 3 separate layers since it keeps everything organized and makes changes way easier later.
Layer 1- Gameplay Foundation: All the stuff that players really interact with and use, such as the platforms they jump off of, walls that people hide behind, and doors that they just open up. Start by creating this layer with some basic grey shapes. Keep it super basic at this stage. No textures, no fancy details. Just pure functionality that works perfectly.
Layer 2- Visual Communication: Art that helps players get a grip on the gameplay layer, like lighting that highlights safe paths or colors that highlight different areas. For example, a glowing doorway says “go this way,” and red spikes say “don’t touch this.”
Layer 3- Atmospheric Polish: It’s all about those little details that really set the mood and give off personality, including background decorations, particle effects, ambient sounds, and little touches that make the world feel alive. Make sure layers 1 and 2 are working perfectly before jumping to layer 3.
2- Color-Coding Systems
Pick 4-5 colors early in development and use them consistently for the same meanings throughout your entire game. Color combinations that work are:
| Color | Common Meaning | Player Response |
| Blue | Water, calm, information | Safe to explore |
| Green | Nature, health, and go signals | Move forward confidently |
| Yellow | Rewards, treasures | Get excited and investigate |
| Red | Danger, enemies, stop | Be careful or prepare for action |
| Purple | Magic, special abilities | Try using special powers |
In Ori and the Blind Forest, blue light always means save points. Orange shows energy pickups, and red indicates immediate danger. Players learn this in 5 minutes and never forget it.
3- Smart Lighting Techniques
Good lighting really helps players find their way and sets the perfect vibe. Check out these 5 tried-and-true methods. Photogrammetry is also too useful for games to look realistic.
- The Bright Path Method: Just brighten up the important routes by about 20-30% compared to the other areas. Players tend to move towards light sources. It’s perfect for outdoor areas, caves, and dimly lit buildings.
- Object Rim Lighting: Add some soft glowing edges to the interactive items because they really pop without feeling fake. The right settings are a glow of 2-3 pixels, with 50% opacity, in a warm white color.
- Changing Color Temperatures: using warm light in the rest areas and shops, and cool light in those tricky challenge areas and boss rooms.
- Depth Through Contrast: Make sure the background areas are about 40-50% darker than the foreground areas because it adds a nice layer that makes it easier to find your way around.
- Dynamic Light Events: There should be flashing lights when important things happen. Flash duration should be between 0.3 and 0.5 seconds at most, and flash intensity is between 150% and 200% of the usual brightness.
4- Asset Creation Tips
Smart asset creation prevents redoing work later. Follow these proven workflows.
The Modular Building System:
- Create 10-15 basic building pieces that all connect smoothly
- Build entire levels using just these pieces
- Add unique details only for special story moments
- Plan connections before creating individual pieces
The Rapid Testing Pipeline:
- Start with simple placeholder art (grey boxes, basic shapes)
- Test gameplay thoroughly before adding details
- Replace placeholders one piece at a time
- Test again after each art replacement
5- The Performance Budget Method
Set limits before creating art and then stick to these limits from day one.
Typical mobile game budgets:
- 1,000-2,000 triangles per main character
- 500-800 triangles per background object
- 512×512 pixel textures maximum
- 200-300 draw calls per scene
PC game budgets allow more:
- 5,000-8,000 triangles per main character
- 1,000-2,000 triangles per background object
- 1024×1024 pixel textures for important objects
- 500-800 draw calls per scene
6- Visual Flow and Composition Rules
Guide players smoothly through levels using proven composition techniques.
1- The Rule of Thirds for Level Design: Divide each view into 9 sections using imaginary lines. Place important objects where lines intersect. It works for game camera setups, room layouts, and platform placement
2- Leading Lines Technique: Use architectural elements to point toward important areas. Fences, pathways, and roof edges all work as natural guides. For example, in Uncharted games, broken columns, and fallen beams always point toward the next climbing route.
3- Framing Important Elements: Surround key objects with contrasting elements. Dark doorways frame bright outdoor areas, and light tunnels frame dark rooms ahead.
4- Z-Depth Organization: Arrange objects in 3 distinct depth layers:
- Foreground: Interactive elements (0-20 feet from camera)
- Midground: Main action areas (20-100 feet from camera)
- Background: Atmosphere and context (100+ feet from camera)
Keep each layer visually distinct through lighting, color, or detail level.
7- Sound and Visual Integration
Audio and visuals should work together to create complete experiences.
Audio Cues for Visual Elements:
- Footstep sounds change on different surface textures
- Interactive objects make subtle audio hints when players get close
- Environmental sounds match the visual atmosphere
Audio and visual events should start within 50 milliseconds of each other since longer delays feel disconnected.
Best Tools For Level Design and Art Integration Tools
Software that gets art and design working together includes:
| Tool Purpose | Free Option | Paid Option | Monthly Cost | Why It Matters for Integration |
| Level Building | Unity Personal | Unity Pro | $0 / $150 | Let artists and designers work in the same environment |
| 3D Art Creation | Blender | Maya | $0 / $215 | Creates art that fits perfectly in levels |
| Texture Work | GIMP | Photoshop | $0 / $20 | Makes textures that support gameplay clarity |
| Team Sharing | Git | Perforce | $0 / $20 | Keeps art and design files synced |
Honestly, stick with free tools for at least 6 months and upgrade only when free tools slow down your team’s collaboration.
The best tool combinations that make integration smooth are:
- Starter Setup (Zero Cost): Unity + Blender + GIMP + Git
- Studio Setup ($235/month): Unity Pro + Maya + Photoshop + Perforce
- Smart Balance Setup ($170/month): Unity + Blender + Photoshop + Git
How To Test If Your Level Design and Art Integration Work?
Trying out how art and design come together needs some new viewpoints. Creators really have a solid grasp on how levels should function, and players, on the other hand, are sharing insights on how visual cues sometimes miss the mark in supporting gameplay effectively.

1- Test Their Navigation for 5 Minutes
Hand over your level to someone who has no instructions at all. Then, take a moment to watch them play for just 5 minutes and notice each time they pause, seem confused, or change their mind.
- 0-2 confusion moments = integration works well
- 3-5 confusion moments = needs refinement
- 6+ confusion moments = major integration problems
Fix the biggest problems with navigation as soon as possible, and then test again with different people.
2- Check The Gamer Emotion throughout the Game
Once you’ve wrapped up the game testing, you should ask the players, “What did you think about this level? How did it make you feel?” Take a look at how the responses align with what you want to feel emotionally.
- Successful scary level → Players report “tense, nervous, excited”
- Failed scary level → Players report “confused, lost, frustrated”
3- Collect Feedback for Art-Design Integration
Silent Observation (Most Revealing): Watch without speaking while players navigate. Document carefully:
- Where do they pause to examine visual elements?
- Which interactive objects do they try first?
- When do they misread visual cues about gameplay?
- How do they respond to lighting and color guidance?
Targeted Post-Play Interview (15 minutes maximum): Ask integration-specific questions:
- “What visual elements helped you understand where to go?”
- “Which areas felt confusing and why?”
- “How did the art style affect your gameplay experience?”
- “What did different colors and lighting make you expect?”
Always Go For Level Design and Art Integration
It’s not just luck that brings art and design together in perfect harmony when creating levels. From the very start, you need to plan, work well with your team, and get feedback from real players who will be honest with you. Begin with the free tools, try out the 3-layer building method, and keep in mind that simple usually wins over fancy.