
A 3D environment can have excellent models and high-resolution textures and still feel artificial. Often, the problem is not the amount of detail. It is the way that detail responds to light.
We recognize materials partly through their lighting response. Polished stone catches reflections differently from unfinished concrete. Old wood scatters highlights differently from lacquered furniture. A metal surface cannot be judged from its color alone, just as the shape of a building becomes difficult to read without convincing light and shadow.
This is why lighting and shading should not be treated as finishing touches added after the rest of the environment is complete. They develop alongside textures, materials, cameras, rendering, and eventually post-processing.
A good lighting and shading pipeline moves from observation and reference gathering to light blocking, material development, advanced illumination, optimization, and final grading. The exact tools change between games, animation, VFX, and architectural visualization, but the underlying problem remains the same: the artist has to create a consistent world in which light and surfaces behave believably.
What Is the Lighting and Shading Pipeline?
The lighting and shading pipeline is the part of 3D production that controls how light behaves inside a scene and how surfaces respond when that light reaches them.
These are separate disciplines, but they are difficult to develop successfully in isolation. A material can look convincing under one studio light and completely wrong in daylight. Likewise, even a technically accurate lighting setup can produce an unconvincing image if roughness, reflections, normals, or material values are incorrect.
That back-and-forth relationship is why lighting, shading, texturing, look development, and rendering frequently overlap during environment production.
Lighting
Lighting establishes where illumination comes from, how strong it is, its color, the shadows it creates, and how it travels through the scene.
For realistic environments, that means thinking beyond individual light sources.
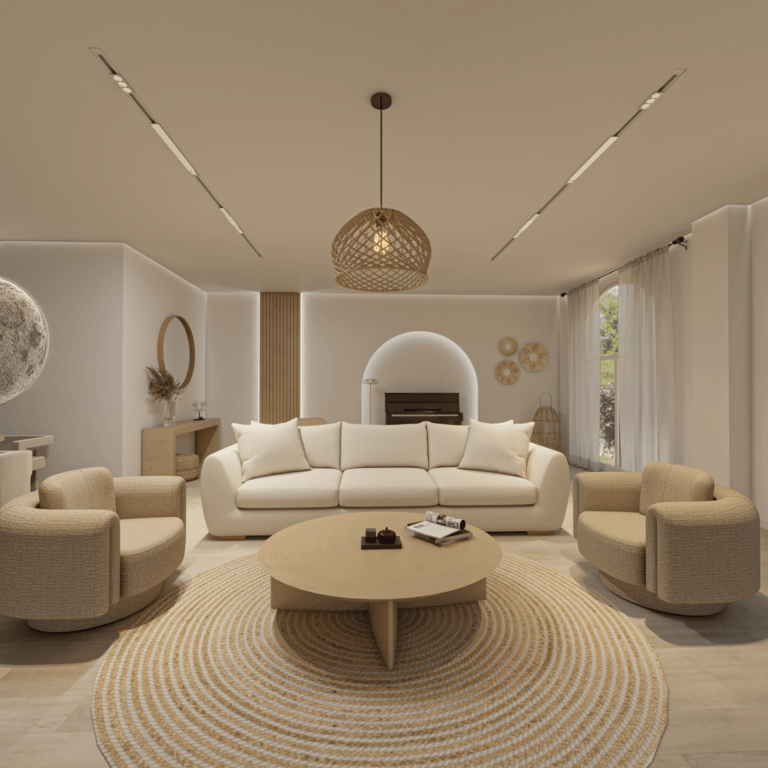
Consider an interior room with a large window. Direct sunlight may illuminate only a small part of the floor, yet the rest of the room is still visible because light from the sky and surrounding surfaces contributes indirect illumination. The color of nearby walls can influence bounced light, while the size and position of the window affect shadow softness and contrast.
The same principle applies outdoors. Sunlight provides a strong directional component, but the sky, surrounding architecture, terrain, vegetation, and reflective surfaces also affect the final result.
Our guide to 3D lighting techniques looks more closely at methods such as global illumination, HDR lighting, volumetric lighting, and common lighting setups.
Shading
Shading determines what happens after light reaches a surface.
A shader evaluates properties such as surface orientation, roughness, reflectivity, metallic response, transmission, and other material characteristics to determine the final appearance of the surface. Modern physically based shading systems are designed to make these responses more predictable and consistent under different lighting conditions. Blender’s current Principled BSDF, for example, combines several material components into one physically based shader based on the OpenPBR Surface model.
This is also where terminology can become confusing. A texture stores information. A material combines properties describing a surface. A shader determines how that surface is evaluated during rendering.
We explain those distinctions in more detail in textures, materials, and shaders.
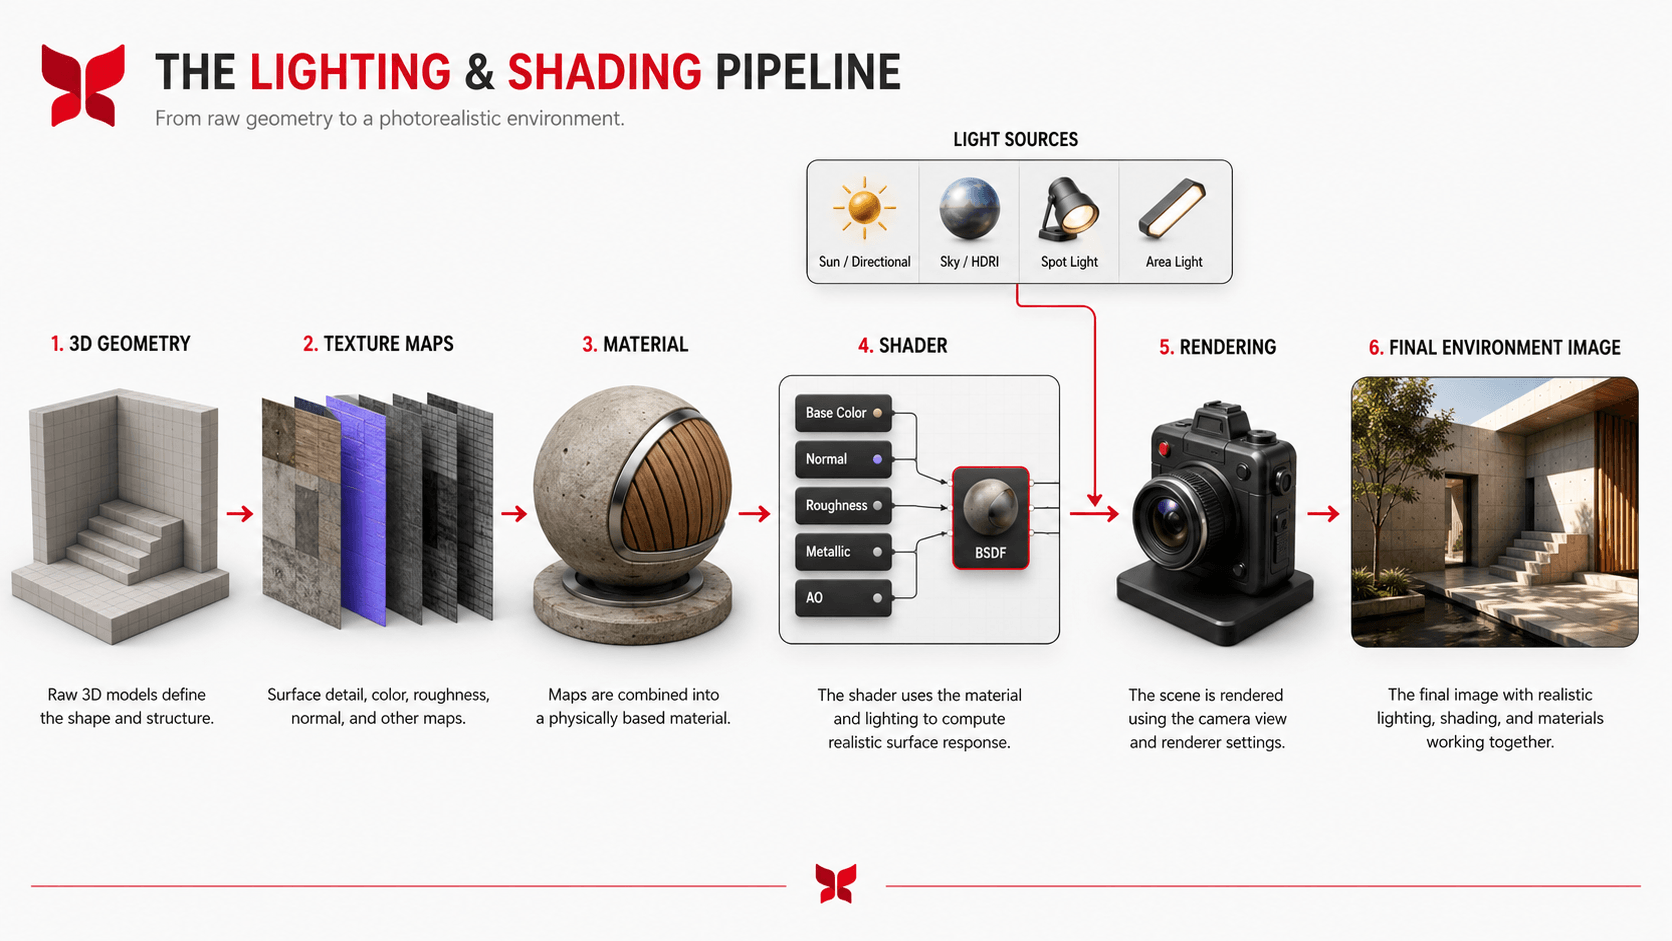
A useful visual introduction to the graphics pipeline is also provided in How Graphics Works? Render Pipeline Explained, which walks through how scene information eventually becomes a rendered image.
The Role of Lighting and Shading in Realistic Environments
Realism depends heavily on whether different visual clues agree with one another.
If a concrete wall has the right color but reflects light like polished plastic, something feels wrong. If sunlight enters a room but surrounding surfaces receive no believable bounced illumination, the space can feel hollow. If every material has identical highlight softness, separate objects start to look as though they were made from the same substance.
Lighting also carries information about scale, depth, weather, and time.
A low sun creates long directional shadows and warm direct illumination. An overcast sky creates much broader, softer illumination. A small practical lamp produces a very different falloff from daylight entering through a large opening.
Shading adds another layer of evidence. Surface roughness, imperfections, normal variation, reflectivity, and transmission tell us whether something is wet, dusty, polished, painted, porous, smooth, old, or newly manufactured.
Neither side works particularly well without the other.
This relationship is especially important for a 3D environment artist, because the final environment has to feel like one coherent space rather than a collection of individually impressive assets.
Stages of the Lighting and Shading Pipeline
A production pipeline is rarely perfectly linear. Lighting may expose a material problem, a shader change may alter the lighting balance, or a camera adjustment may require another lighting pass.
Even so, there is a sensible order of operations.
The most efficient workflows solve large visual decisions before small ones. Artists establish references and major lighting relationships before polishing tiny reflections or adding layers of post-processing.
1. Concept Development and Reference Gathering
Realistic lighting begins with observation.
Before opening a lighting tool, it helps to identify the physical conditions that should exist in the scene. Where is the environment located? What time of day is it? What is the weather? Which surfaces dominate the environment? What are the primary and secondary light sources?
Reference gathering should answer those questions.
A useful lighting reference is not simply a beautiful photograph. It should reveal information about shadow direction, highlight intensity, exposure, color temperature, atmosphere, and indirect illumination.
Material references should be equally specific. “Metal” is not a useful target by itself. Brushed aluminum, oxidized copper, chrome, cast iron, stainless steel, and painted steel behave very differently.
Realism improves when the artist studies those differences instead of relying on a mental idea of what a material is supposed to look like.
2. Blocking and Initial Light Setup
The first lighting pass should establish the scene rather than finish it.
Artists often simplify the environment during this stage so that they can concentrate on form, value, and direction. Detailed textures can make poor lighting harder to diagnose, which is why a neutral material or simplified material setup can be useful during blocking.
For an exterior scene, an initial setup may only need a primary directional light and environmental illumination. For an interior, the first concern may be the relationship between windows, exterior illumination, and major practical lights.
At this point, the important questions are broad ones.
Can the architecture be read clearly? Does the lighting direction support the composition? Are important areas separated from the background? Does the scene have an understandable hierarchy of light and shadow?
If the basic lighting does not work, adding ten corrective lights usually hides the problem rather than solving it.
3. Material and Texture Shading
Once the broad lighting is useful enough to evaluate surfaces, material development becomes more meaningful.
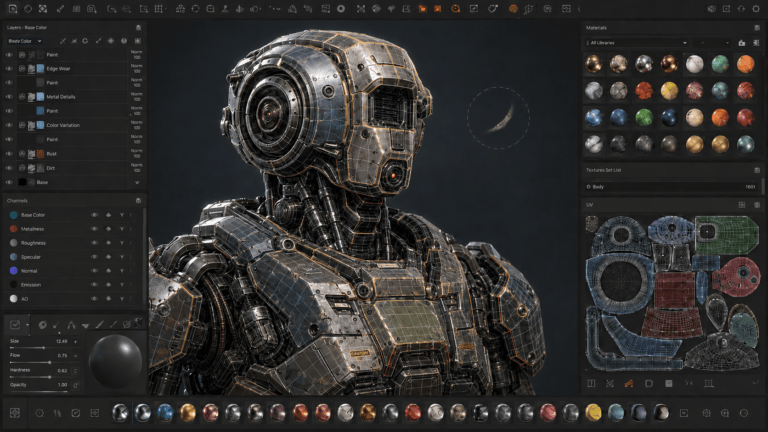
In a metallic-roughness PBR workflow, artists commonly work with information such as base color, metalness, roughness, normal detail, ambient occlusion, and emissive properties. Additional surfaces may require transmission, subsurface scattering, displacement, clear coat, or other specialized behavior. Adobe similarly describes PBR materials as collections of channels in which individual channels represent physical surface properties, including base color and roughness.
The important point is that more maps do not automatically produce more realism.
Each map needs a reason to exist.
Roughness is particularly influential because it changes the character of reflections. A polished surface produces a tighter highlight and clearer reflection than a rough surface, where reflected light spreads across microscopic surface irregularities.
Small roughness variation can also tell a story that color alone cannot. Fingerprints, polished edges, weather exposure, dust, dried water, or repeated contact may all affect reflection differently.
For a broader explanation of these material systems, see our guide to physically based rendering. The actual creation and preparation of surface maps is covered separately in our 3D texturing process.
Pwnisher’s Unreal Engine Materials in 6 Levels of Complexity is a useful practical example of how an Unreal material can evolve from a simple setup into a reusable master material.
4. Advanced Lighting Techniques
After the major lighting and materials work together, more advanced techniques can be introduced where they actually improve the image.
Global illumination is one of the most important. Light does not simply hit a surface and disappear. Some energy is reflected into the surrounding environment, creating indirect light, color bleeding, and much of the subtle illumination we associate with real spaces.
Real-time engines increasingly reproduce this behavior dynamically. Unreal Engine’s Lumen, for example, provides dynamic global illumination and reflections and supports diffuse interreflection across large environments.
Environment lighting can also come from HDR skies or physically based sky systems, while volumetric effects make light visible through fog, dust, smoke, or atmospheric moisture.
These tools are powerful, but they work best when they support conditions already implied by the scene.
If there is no convincing reason for heavy fog, volumetric shafts will not make the scene more realistic. If the material response is wrong, ray-traced reflections simply reproduce the wrong material more accurately.
5. Real-Time vs. Pre-Rendered Lighting
The final medium determines how much rendering work can be performed for each frame.
Offline rendering can afford far more expensive sampling because a single frame may take seconds or minutes to calculate. Real-time rendering applications have to continually produce new images while the user or camera moves through the environment.
This changes production decisions.
Real-time projects may rely on combinations of baked information, probes, screen-space effects, rasterization, hardware ray tracing, dynamic GI, and other techniques to achieve the required balance between image quality and speed.
Pre-rendered work has more freedom to use computationally expensive ray- or path-traced solutions when the additional render time is justified.
Neither approach is automatically better.
A game environment that looks excellent while maintaining its performance target has succeeded at a different problem from an animation frame that can spend significantly longer on rendering.
Our article on rendering techniques provides a broader comparison of rasterization, ray tracing, path tracing, and related approaches.
Unity’s URP lighting training is a useful example of how these decisions are approached inside a real-time production environment.
Unity itself provides multiple render pipelines intended for different production and hardware requirements. The following overview is useful when the terminology around Built-in, URP, and HDRP becomes confusing.
6. Lighting Optimization for Realistic Environments
The best-looking lighting setup is not useful if it cannot run on the target hardware.
Dynamic shadows, volumetrics, reflection systems, transparent materials, complex shaders, large textures, and global illumination can all consume rendering resources. In a real-time project, artists therefore have to decide where visual complexity matters.
A hero surface near the camera may justify a more complex shader than a wall hundreds of meters away. A major light may need high-quality dynamic shadows while a small decorative source does not. Distant assets can use reduced texture resolution, simplified materials, or lower levels of geometric detail.
The important distinction is between optimization and indiscriminate reduction.
Good optimization protects the parts of the scene viewers actually notice.
The same thinking extends beyond lighting. Our game asset optimization guide covers models, materials, textures, LODs, and other elements that compete for the same rendering budget.
7. Post-Processing Effects and Color Grading
Post-processing determines how the rendered image is finally presented.
Exposure, tone mapping, contrast, color balance, bloom, depth of field, atmospheric effects, and color grading can help different parts of a scene sit together visually.
They can also hide problems temporarily.
If an interior is too dark because the indirect lighting does not make sense, lifting the shadows heavily in post may simply create a flat image. If every material is too reflective, reducing highlights globally does not fix the materials.
It is useful to occasionally disable heavy post-processing and inspect the underlying render.
The strongest grade usually begins with an image that already works.
For a closer look at final image adjustment, see our guide to color correction.
8. Integrating Shading Models and Techniques
A material should survive more than one flattering lighting setup.
This is especially important during look development. A material that looks convincing under a large softbox may become obviously incorrect under direct sunlight or at a grazing angle.
Artists can test materials using neutral lighting, hard directional light, soft environmental light, bright HDR environments, and low-light conditions. The purpose is not to create five finished renders. It is to expose weaknesses.
Different material classes also require different shading behavior.
Stone is largely opaque. Glass requires transmission and reflection. Leaves often need two-sided or transmission behavior. Skin and wax involve subsurface scattering. Coated surfaces may have more than one reflective layer.
For larger productions, these systems may involve a specialist shader artist who works between artistic requirements and rendering technology.
Tools and Software for Lighting and Shading
Lighting and shading tools vary according to the destination of the project, but the underlying concepts transfer well between applications.
Blender provides node-based materials and the Principled BSDF as a broad physically based surface shader. Unreal Engine combines a node-based Material Editor with systems such as Lumen for dynamic global illumination and reflections. Unity’s HDRP is built around physically based lighting, HDR rendering, and higher-fidelity graphics features.
Substance 3D tools are frequently used during material creation because PBR properties can be authored and previewed together while the artist works on the asset.
Maya, Arnold, V-Ray, Houdini, and other DCC and rendering packages fill different roles depending on whether the project is aimed at film, animation, effects, visualization, or games.
The more important skill is understanding what is happening underneath the interface.
An artist who understands roughness, exposure, light size, indirect illumination, normals, and physically plausible material behavior can move between tools more easily than someone who only remembers where particular buttons are.
For artists specifically interested in lighting as a profession, So You Wanna Be a 3D Lighting Artist? also gives a useful overview of lighting work within VFX pipeline and animation production.
Best Practices for Realistic Lighting and Shading
The most reliable realistic workflows are usually built around restraint and observation.
Keep reference visible while working. It becomes much easier to notice that a shadow is too sharp, a material too glossy, or an interior too bright when there is a real-world comparison nearby.
Work from large decisions toward small ones. Establish the sun, sky, main interior sources, exposure, and broad material response before spending time on scratches or tiny practical lights.
Keep physical scale consistent. Lighting calculations, texture scale, atmospheric depth, and surface detail all become easier to judge when the environment exists at believable dimensions.
Do not make roughness random simply to create variation. Variation should reflect the way an object is manufactured, touched, damaged, cleaned, weathered, or exposed.
The same rule applies to dirt.
A uniformly generated grunge map across every asset rarely feels natural. Dust gathers on upward-facing surfaces. Rain streaks follow gravity. Edges may become polished from contact. Areas protected from weather age differently from exposed surfaces.
Realism is less about adding imperfection everywhere and more about putting the right imperfection in the right place.
Finally, judge the environment from the camera and distance at which it will actually be seen.
A material that looks wonderful in an extreme close-up may become distracting when tiled across an entire building. Fine normal details can produce shimmer in motion. Strong reflections can create noise during camera movement. A beautiful still frame does not guarantee a stable animated or interactive scene.
Challenges in the Lighting and Shading Pipeline and How to Overcome Them
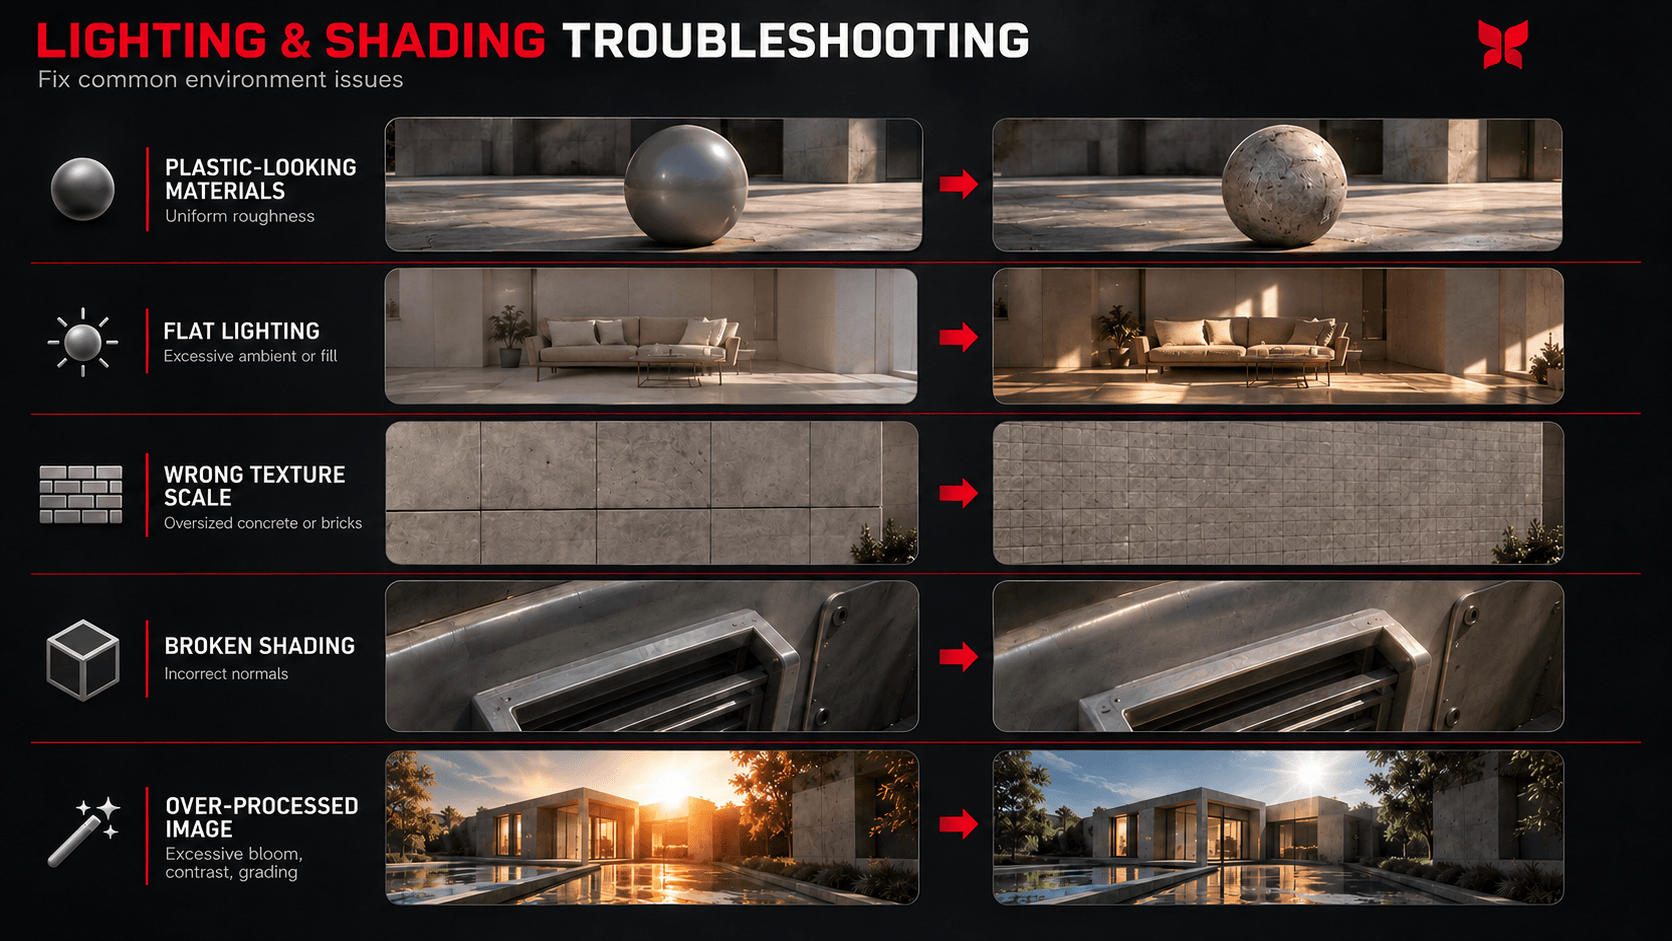
Most lighting and shading problems are not caused by a lack of advanced features. They come from a small group of basic relationships being slightly wrong.
One of the most common is the plastic look. When unrelated materials use similar roughness and reflection behavior, concrete, stone, painted wood, and plastic begin to feel like variations of the same substance. Comparing highlight shape and reflection softness against real reference usually exposes this quickly.
Another problem is flat lighting. Increasing ambient illumination can reveal more of the scene, but too much destroys separation between light and shadow. It is usually better to investigate indirect illumination, exposure, and major light sources before filling every dark area with another light.
Incorrect texture scale can be just as damaging. Bricks, pores, scratches, tiles, and surface noise need to make sense relative to the dimensions of the asset. UV distortion or inconsistent texel density can make the problem worse. Our guide to UV mapping covers the relationship between geometry and texture placement in more detail.
Normals and smoothing also deserve attention. Because surface orientation influences shading calculations, incorrect normals can produce strange highlights, dark patches, or visible seams even when the textures themselves are correct.
Then there is over-correction.
The lighting artist adds a light because an asset is too dark. The material is made brighter to compensate for another lighting condition. Post-processing is adjusted to compensate for both. Before long, several systems are fighting each other.
When this happens, it is usually worth returning to the simplest version of the scene and checking the main light, environmental illumination, exposure, material values, and normals again.
Case Studies
Real production examples are valuable because they show that realistic lighting does not depend on one universal technical solution.
Some projects use dynamic global illumination. Others deliberately combine baked and real-time information. The correct approach depends on how much the environment changes, the target hardware, the visual target, and how much rendering time is available.
1. The Matrix Awakens
Epic’s The Matrix Awakens showed what a large dynamically lit city could look like using Unreal Engine 5.
Epic states that Lumen provided dynamic global illumination and reflections throughout the interactive sections of the experience, while real-time ray tracing was also used for soft character shadows in the cinematic material.
The important production lesson is flexibility.
Dynamic indirect illumination allows the environment to respond when major lighting conditions change. Epic has specifically discussed Lumen solving indirect-lighting challenges across the large-scale city used in The Matrix Awakens.
That does not make baked lighting obsolete. It changes the trade-off. More lighting can react at runtime, but the system must still fit within a real-time performance budget.
2. Book of the Dead
Unity’s Book of the Dead demonstrates a more hybrid approach.
Unity describes the environment as using baked indirect global illumination while keeping direct sunlight in real time. Indirect sun and sky contributions were stored in lightmaps and probes, while the direct sun contribution could remain responsive at runtime.
This approach is still instructive because it separates what needs to change from what does not.
If an environment is largely static, precomputing parts of its illumination can free resources for other rendering tasks while retaining dynamic direct lighting where it has the greatest visual impact.
3. The Heretic
Unity’s The Heretic demonstrates another solution within a real-time pipeline.
Unity states that the project was lit entirely with real-time lights and used HDRP to produce its cinematic-quality environment.
Together, Book of the Dead and The Heretic illustrate an important point.
The route to a believable image can change even within the same engine ecosystem. One project may benefit from baked indirect illumination; another may rely much more heavily on real-time sources.
The pipeline should serve the scene rather than forcing the scene to serve the technology.
Final Thoughts
Realistic lighting and shading are less about finding a perfect renderer and more about getting a series of connected decisions right.
Modeling establishes the physical form of the environment. Texturing provides surface information. Materials and shaders determine how those surfaces respond to light. Lighting reveals their form, defines depth, and connects them to the space around them. Rendering and post-processing decide how that information finally reaches the viewer.
Problems appear when those stages stop communicating.
A beautiful texture cannot compensate for implausible roughness. Global illumination cannot rescue poor material values. Color grading cannot repair a fundamentally broken light setup.
The stronger approach is iterative.
Start with references. Establish the broad lighting. Test materials under useful conditions. Introduce more complex illumination only when it solves a real problem. Check performance before the scene becomes too expensive to change. Then use post-processing to refine an image that already works.
That is what makes a realistic environment hold together. Not one spectacular effect, but many small decisions about light, material, scale, and surface response that continue to make sense from the first blockout to the final frame.